As I was buying my Maybelline Color Tattoo, Inked in Pink, I couldn't just pass by the spinning CoverGirl display without having a peek. And so goes my downfall because I spotted a metallic/foil looking nail polish in a very pretty shade. This is how I ended up leaving the drugstore with 2 beauty products I really shouldn't have splurged on.
Tuesday, December 25, 2012
Monday, December 24, 2012
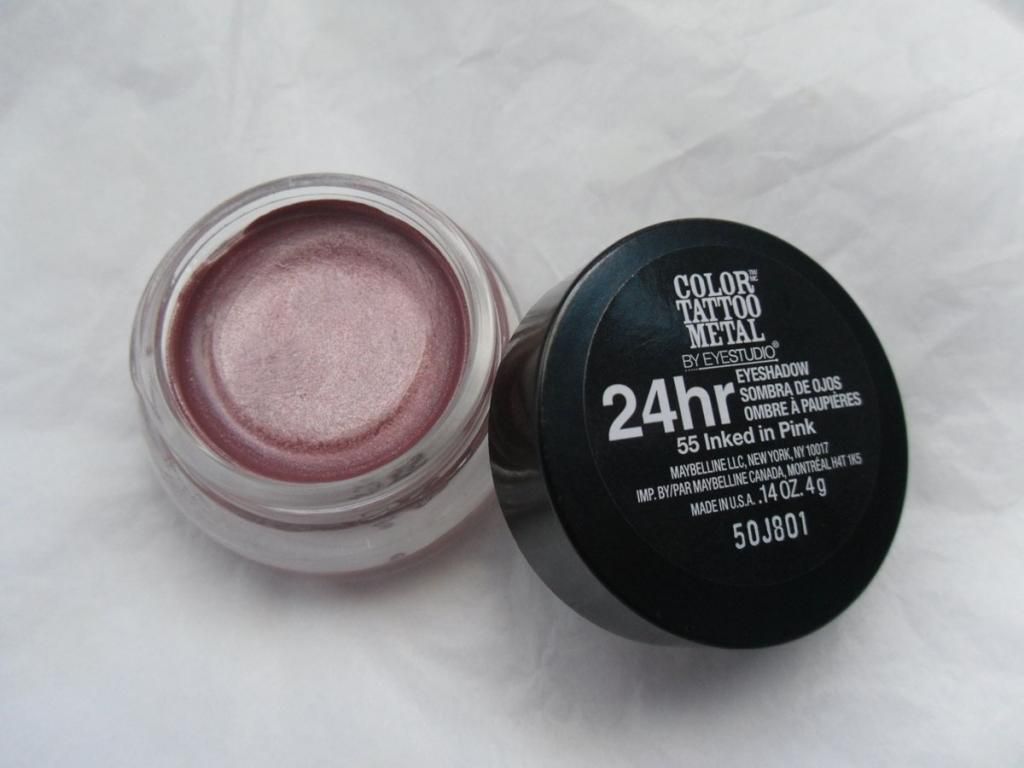
Maybelline Color Tattoo 24HR Metal: Inked in Pink
It must have been new display day at my local drugstore because CoverGirl, L'oreal, and Maybelline all had new displays promoting all sorts of products.
When I have work days that start early, I get pretty lazy with my makeup, yet at the same time I can't really ignore it because I need some perking up from the makeup. Which is why, I have been loving my Barely Beige Color Tattoo. It's so quick to apply and all I need is a rather haphazard application of a crease shade and I'm good to go where eyeshadow is concerned. So when I saw Inked in Pink, I thought it could work well to bring some warmth to my eyes yet still be very wearable for everyday. At least that's how I justified the purchase.
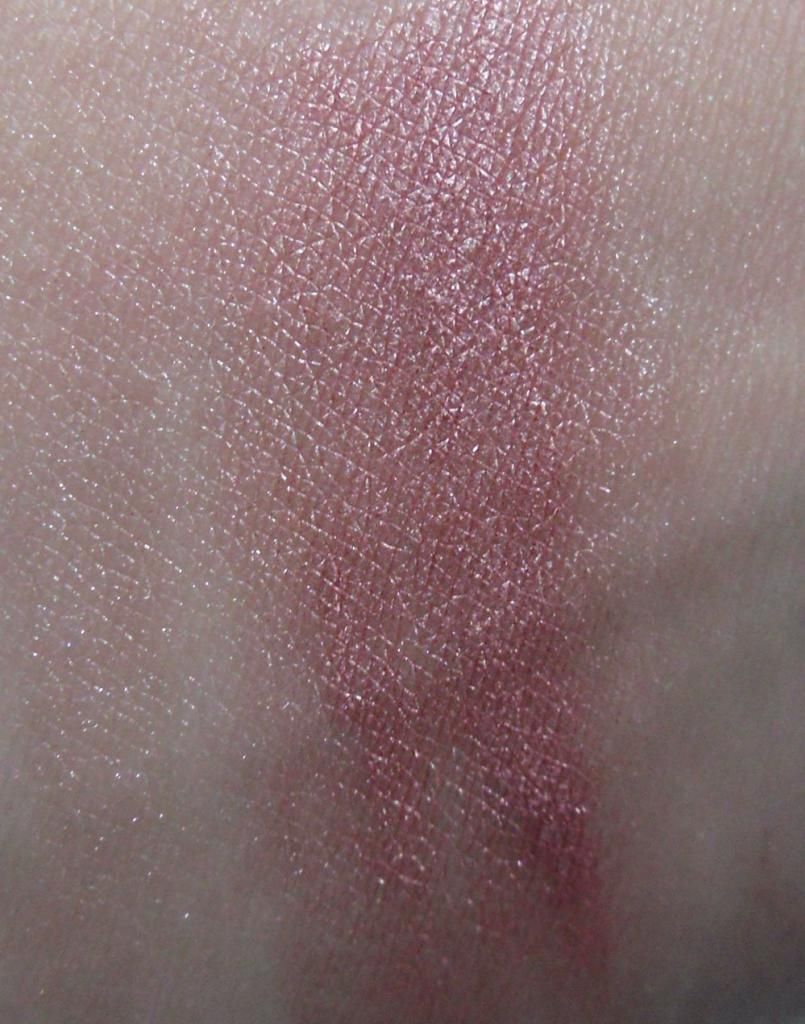
Inked in Pink is a frosty metallic pink shade that leans more towards the warm side to me. This shade definitely looks warm heavily swatched, but blended out it favors the frostiness while still having that hint warmth. As for how I use it, I don't spend too much time being precise applying this color because it blends so wonderfully. Add a bit of a taupe crease shade and I'm done!
I really like the fact this can be my no fuss eyeshadow for days I don't want to work too hard on my eye looks. It's something a bit different from my usual neutrals but still wearable for a work day. There are several new colors available, one of which is a nude shade. If you're looking for affordable cream eyeshadows, I highly recommend the Color Tattoos from Maybelline.
Saturday, December 22, 2012
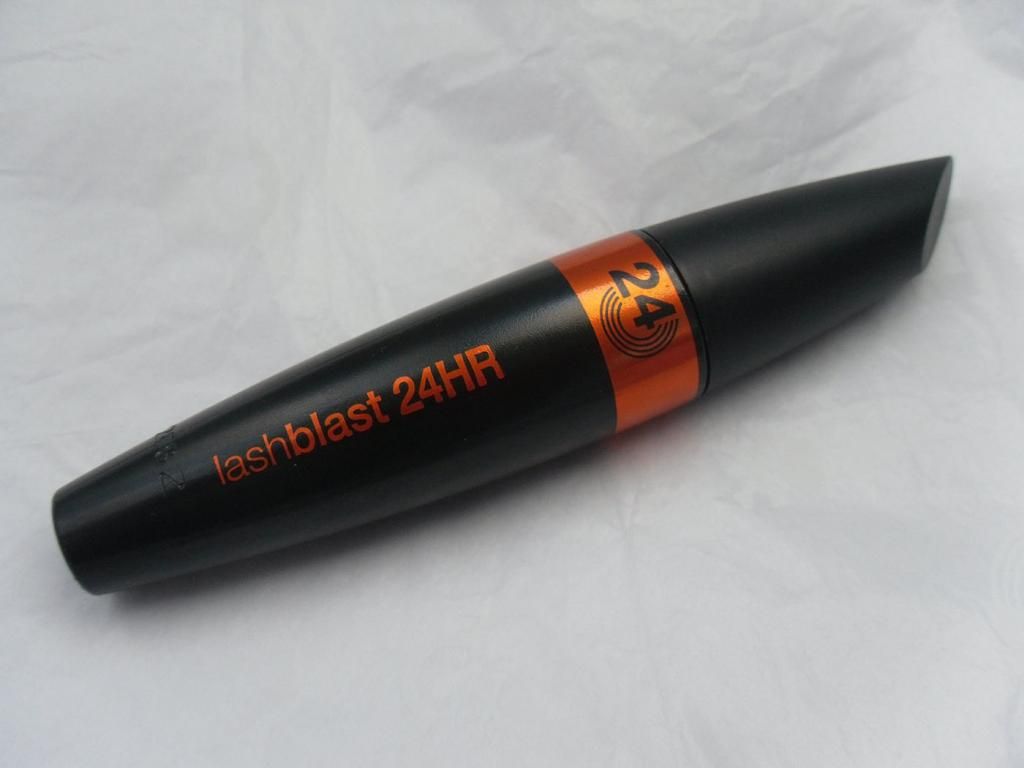
CoverGirl: Lash Blast 24HR
Lately I've been trying out CoverGirl's Lashblast 24HR mascara since it's been rather wet and rainy around here. The other two mascaras I've been using don't hold any curl at all if the weather is heavily misty or rainy, so I thought I'd give Lashblast 24HR a go and see how it works out in those scenarios.
Sunday, December 2, 2012
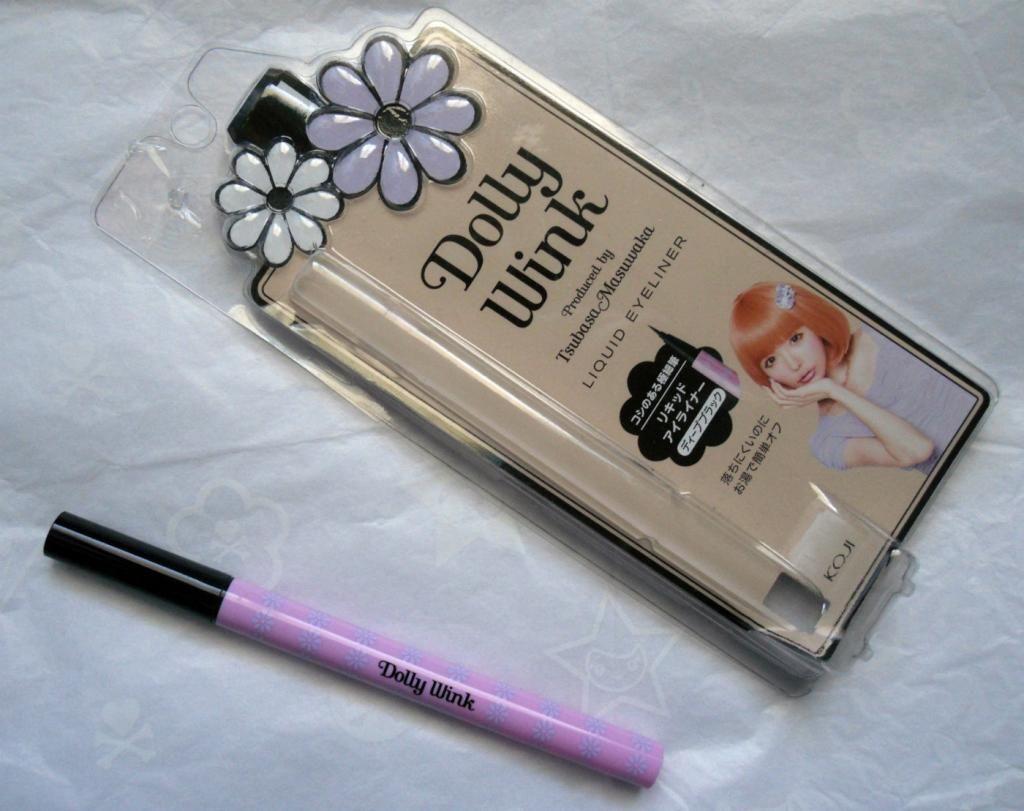
Dolly Wink Liquid Eyeliner
After a week and three storms, here on the Northwest side of the U.S. I decided that photographing black would probably give me the least amount of trouble, since I depend on natural light and it's been unpredictable lately.
Dolly Wink is the brain child of Tsubasa Masuwaka, a Japanese model known for her Gyaru style. The Dolly Wink liquid liner has had some buzz in the beauty community, especially for those that have an interest in Asian beauty products. If you're familiar with the Dolly Wink eyeliner you're probably noticing that mine is has different packaging.
Dolly Wink is the brain child of Tsubasa Masuwaka, a Japanese model known for her Gyaru style. The Dolly Wink liquid liner has had some buzz in the beauty community, especially for those that have an interest in Asian beauty products. If you're familiar with the Dolly Wink eyeliner you're probably noticing that mine is has different packaging.
Sunday, November 25, 2012
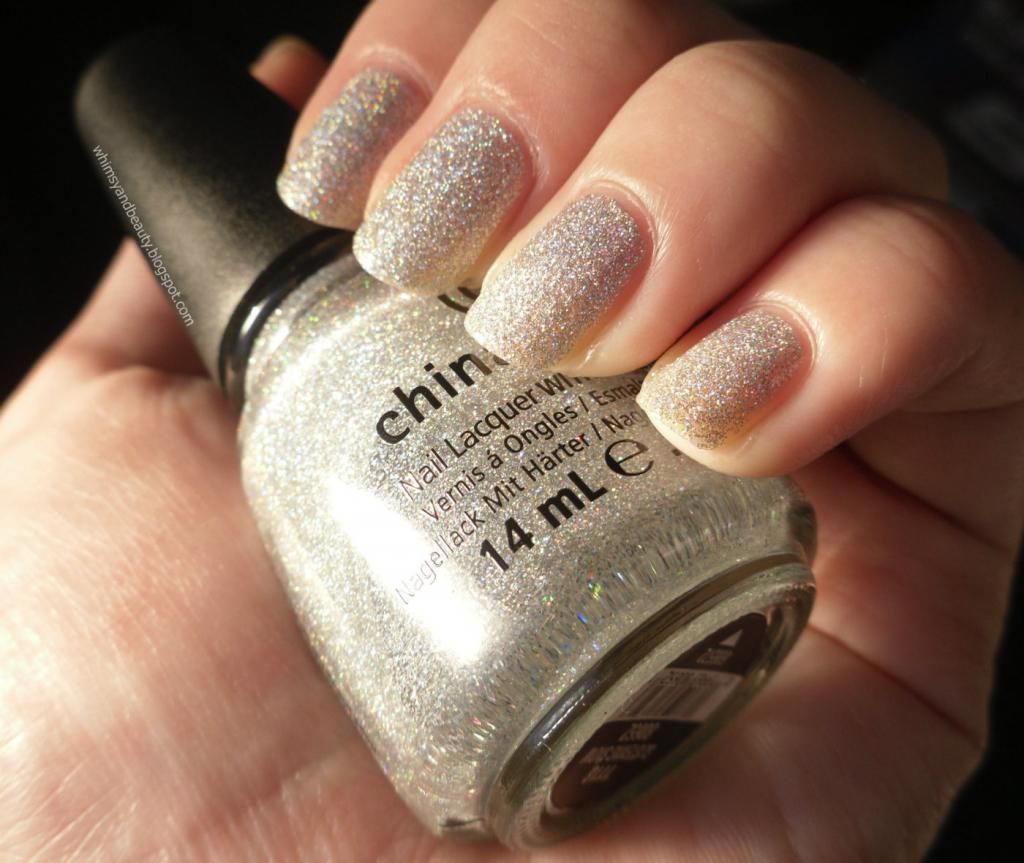
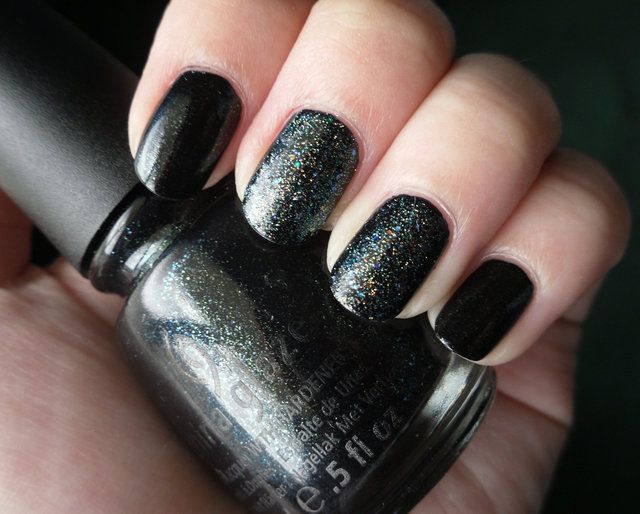
China Glaze: Glistening Snow
So here I am, back with a Black Friday purchase that wasn't actually part of any Black Friday deals. The Sally Beauty Supply I visited was actually near a Best Buy, so while my brother visited there, I went to check out the holiday nail polishes and it looks as though holo glitters and such are going to be the next big thing in nail polish from what previews I've been able to glean lately.
Monday, November 12, 2012
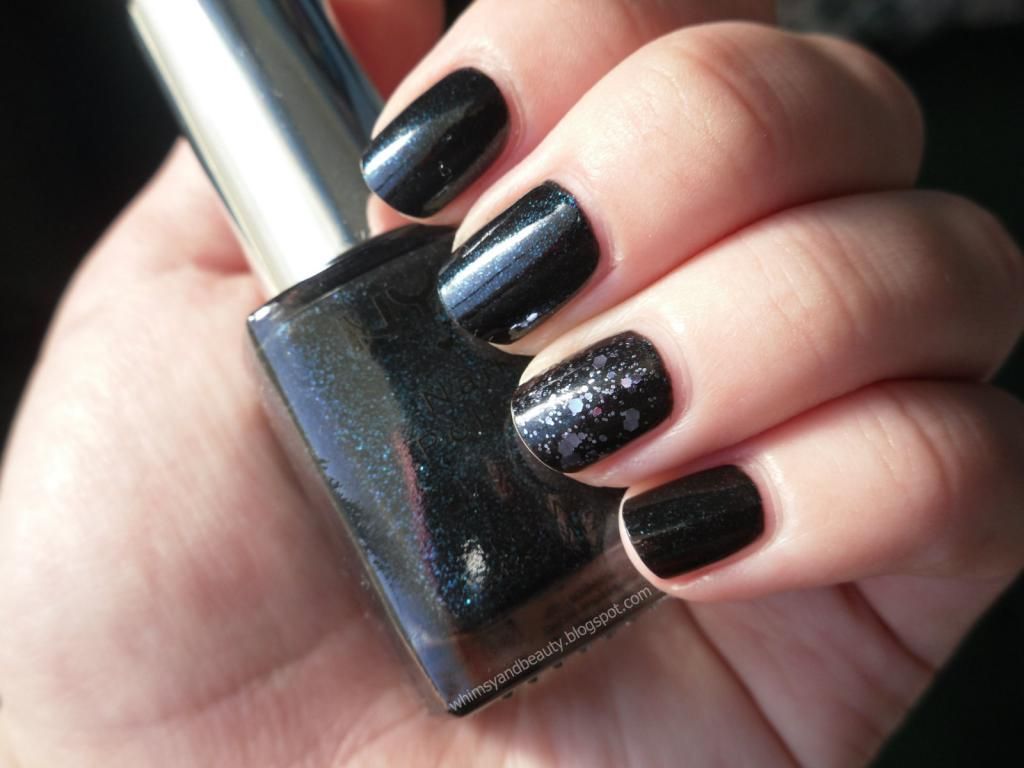
NYX Girls: Robotic
So I'm back with another NYX Girls polish. I decided to try one of their darker colors this time around and I of course bought it from the Variety Shop since they sells these for just $1.25.
Sunday, November 11, 2012
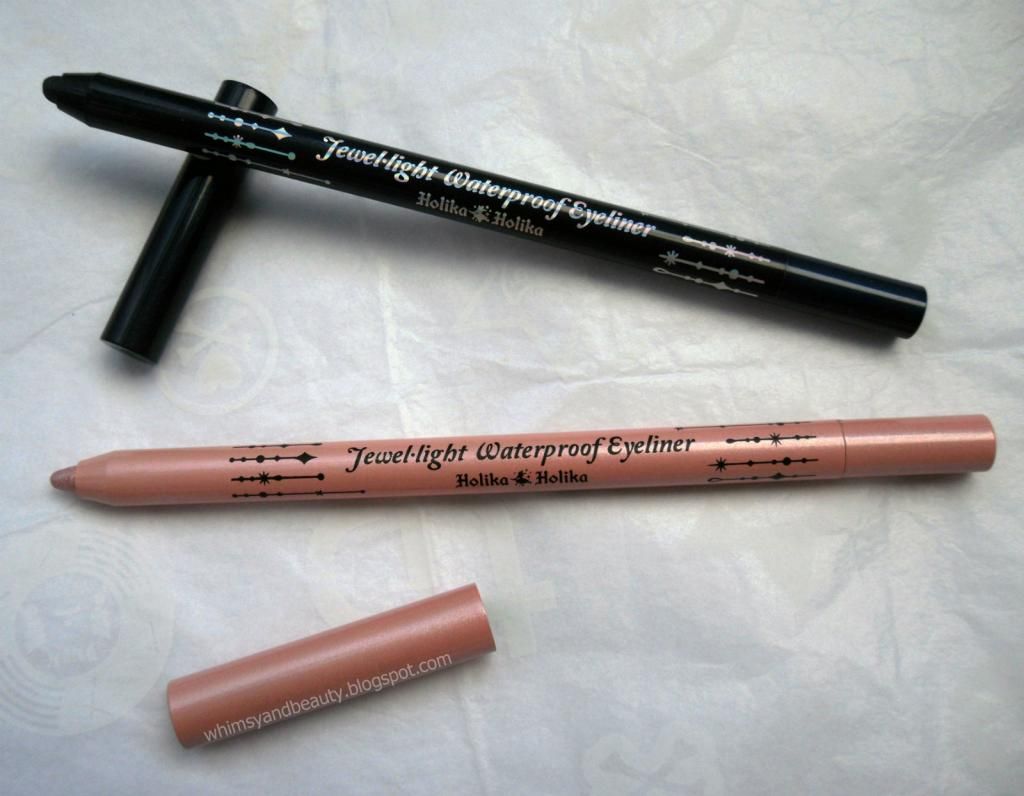
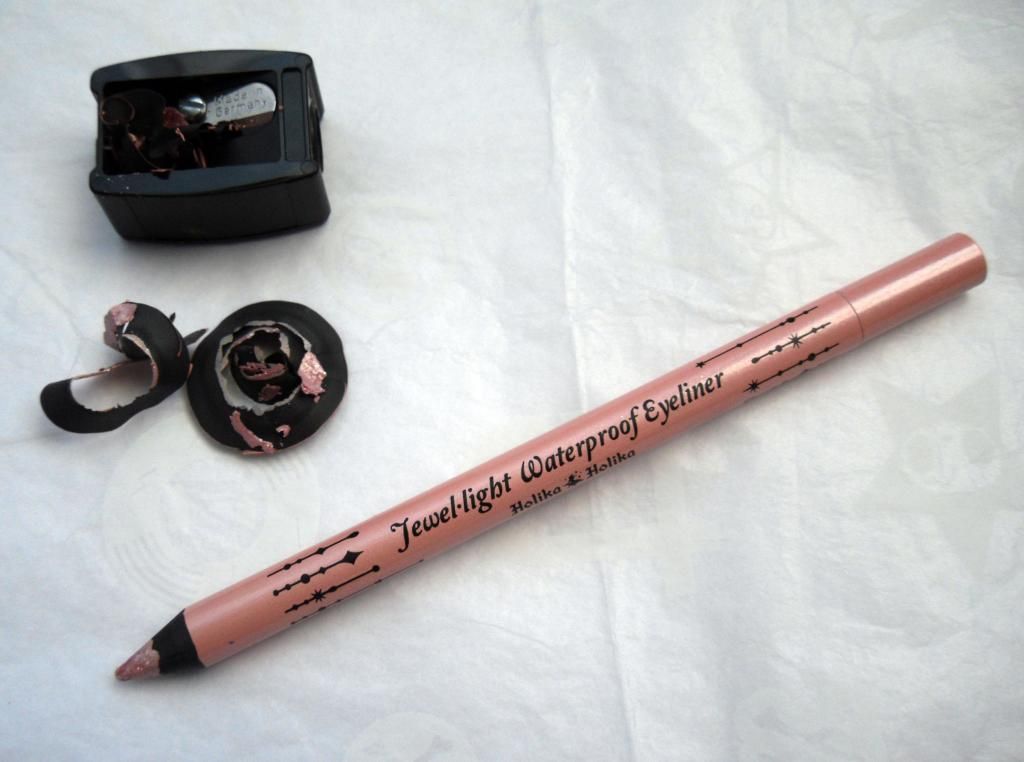
Holika Holika Jewel Light Waterproof Eyeliner
With the winter arriving soon, I wanted to try some jewel toned eye looks, but was looking for more a subtle way to wear it. Visiting Sune, I noticed that they were stocking a new Korean brand called Holika Holika, which looked so cutely packaged, I had to browse for a bit. I don't wear eyeliner as often these days, but when I came across these Jewel Light Waterproof pencils, I fell in love with the smooth texture and the rich colors. Currently Sune only carries 5 shades.
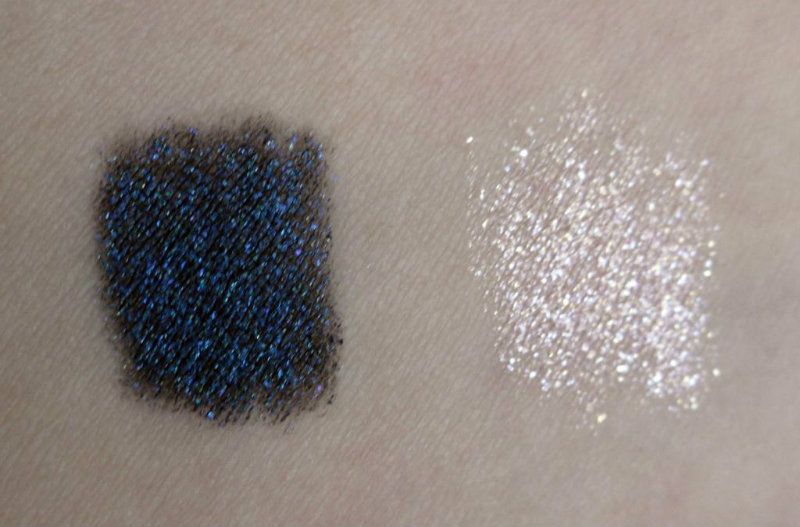
I purchased No. 3 Lapis Lazuli and No. 8 Pink Topaz. Lapis Lazuli is a beautiful reflective navy and Pink Topaz is more of a highly shiny pinkish toned champagne shade. Both are quite generous with the fine shimmer, but they apply quite smoothly with barely any noticeable gritty feeling. There is some time to play around with smudging and whatnot when the pencil is applied, but once it sets the line drawn really won't budge at all. I've worn Lapis Lazuli for more than 8 hours and experienced no noticeable smudging underneath my eyes. I also did not have any fallout from the shimmering bits in the eyeliner. Unless you're the type to really rub your eyes quite vigorously, there should be no risk of glitter being where it's not supposed to.
These eyeliners to claim to waterproof and I feel that they do live up to that claim. Water alone did not affect the swatches I made. However, warm water along with a cleanser removed the eyeliner for me. I also tried using my Clinique eye make up remover and that worked like a charm as well.
I wish the photos did more justice to the colors, but with how shiny and reflective they were, my camera just could not capture how alive these shades were. I usually wear Lapis Lazuli with very minimal eyeshadow and Pink Topaz on the inner corner of my bottom lash line to open up the eyes. The navy eyeliner is such a nice subtle pop of color for everyday wear.
As I was choosing which shades I wanted to buy, I thought these pencils really felt like plastic automatic types. But they didn't twist up at all so I asked the sales girl about them and it turns out these pencils sharpen just like any other. Once you start sharpening, it turns out that the casing is actually black and very easy to shave.
Do be careful though since the product itself is rather soft and could break during the sharpening process even thought the outside shaves away quite smoothly.
Apparently there are 12 color selections in total with these eyeliners. Hopefully Sune will stock them since I'm pretty curious about the more earthy jeweled shades. I bought mine for $9.99 each at Sune.
Saturday, October 27, 2012
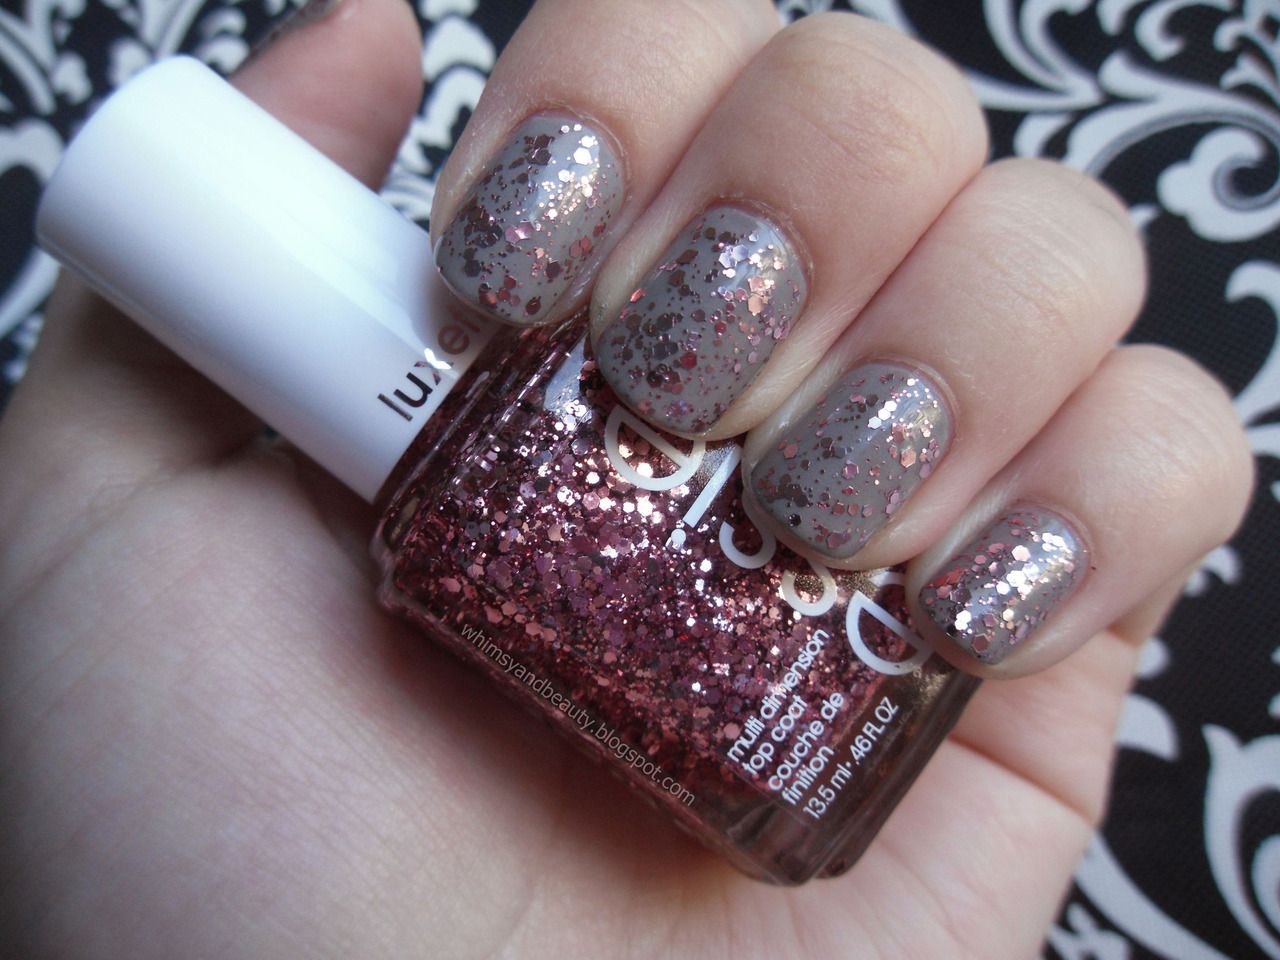
Essie: A Cut Above
I completely broke down and picked up two of the sequin top coats from Essie's Luxeffects line. I have been lusting after A Cut Above and Stroke of Brilliance for months now, but couldn't justify buying glitter polish when I don't wear it as often and I dislike the removal process immensely. However, both are so pretty in the bottle itself and the swatches I've seen make them both look so versatile, so I decided to end the cycle of denial and want, once and for all.
Here I have A Cut Above layered over Orly's Faint of Heart. Excuse the dryness seen, yesterday involved a lot of hand washing using soap that just draws all the moisture out of my skin. The soap was just too rough and there was no other alternatives.
A Cut Above is a rose toned pink glitter that consists of small round glitter plus hexagonal glitter of differing sizes in a clear base. I only needed to use one coat to get the coverage seen in the photo. The application was nice although the glitter did move around a bit for me, but at least the glitter wasn't sparse on the brush. I also like the fact that the clear base wasn't a thick, gooey mess.
I don't go out of my way to choose Essie nail polishes most of the time because I don't prefer their formula or brush, but the Luxeffects collection has been really eye catching. I suppose it's about time I finally jumped on this bandwagon.
Monday, October 15, 2012
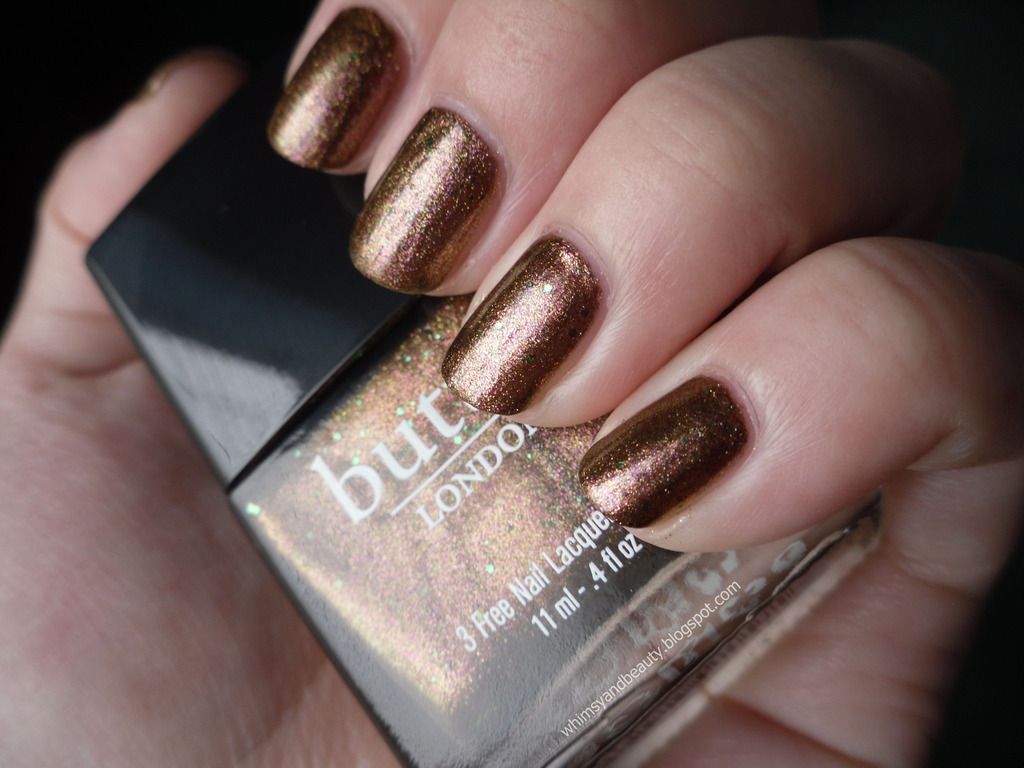
butterLONDON: Scuppered
I was totally naughty this past weekend and splurged on nail polish that I shouldn't have had. But my weakness is metallic foil types of polishes and when I came across butterLONDON's new holiday collection, I couldn't help but browse and fall in love. Most of the collection were glitter polishes, except for two, Scuppered and Jack the Lad, which are described as shimmers.
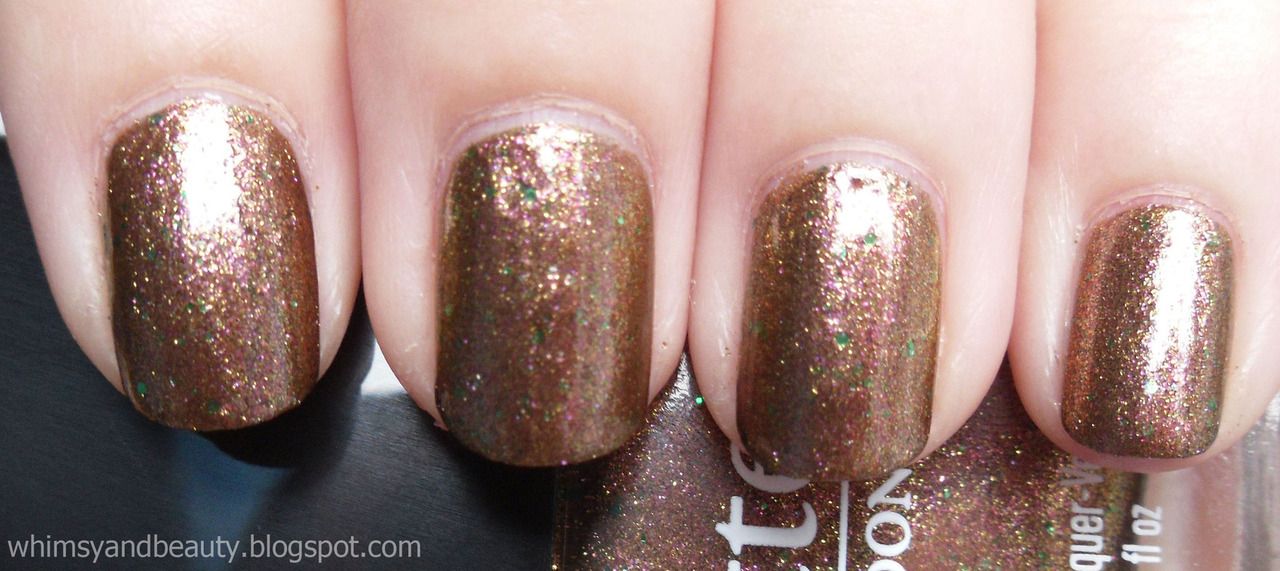
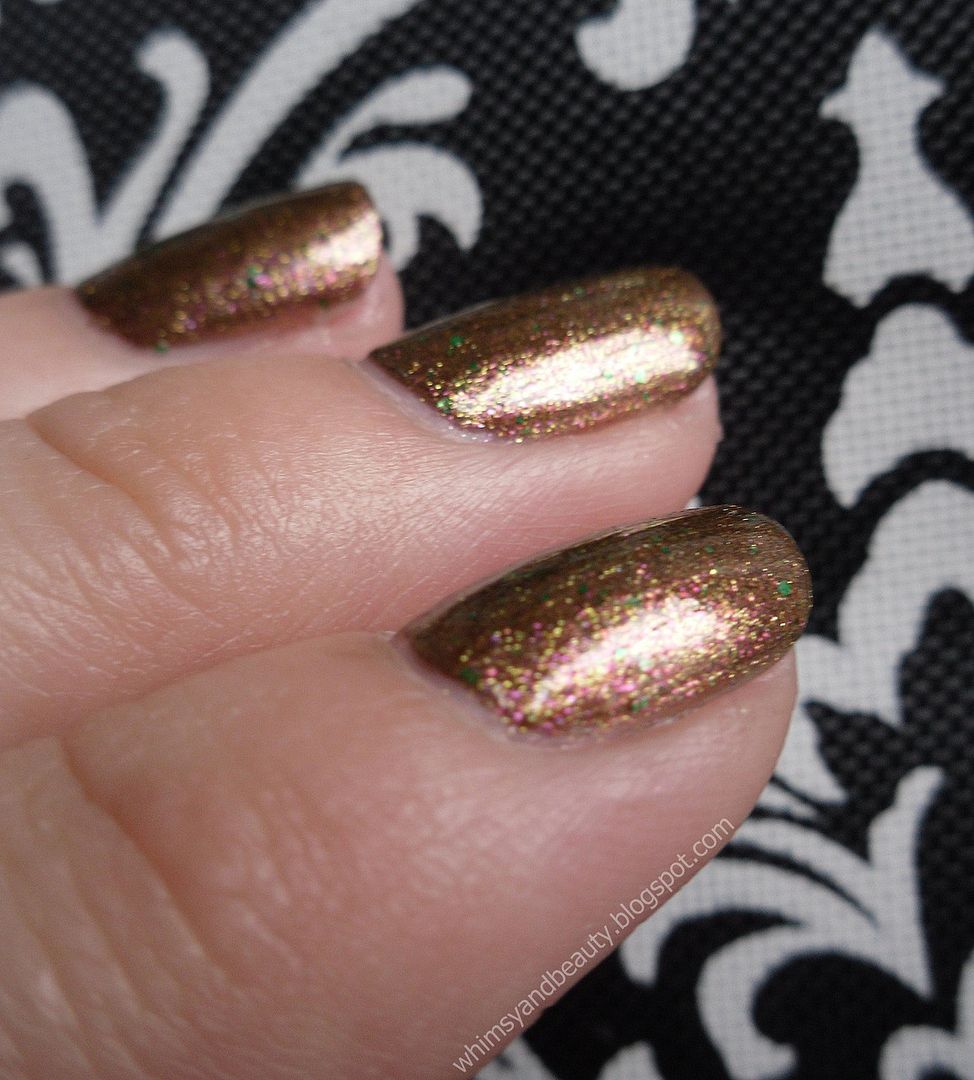
Scuppered is a deep copper foil with underlinings of magenta, plus two sizes of green glitter laced through. Can you see why I couldn't help myself? I never thought I'd be describing this combination of colors in one polish! There's so much going on with it, I had a hard time getting my camera to focus for photographs. The level of shimmer is also fantastic on this one, especially under sunlight.
The formula for this one is quite nice, if a bit on the thick side. But it did not at any point turn into a goopy mess for me. I did need a total of three coats for complete opacity, however, the drying time wasn't too long so it didn't prolong my manicure session.
When my nails catches the light just right, I can definitely see all the facets of Scuppered in play. It's such a pretty shade for fall and winter. I am just charmed with it. I may be out $14 but I think Scuppered was completely worth it.
Scuppered is a deep copper foil with underlinings of magenta, plus two sizes of green glitter laced through. Can you see why I couldn't help myself? I never thought I'd be describing this combination of colors in one polish! There's so much going on with it, I had a hard time getting my camera to focus for photographs. The level of shimmer is also fantastic on this one, especially under sunlight.
When my nails catches the light just right, I can definitely see all the facets of Scuppered in play. It's such a pretty shade for fall and winter. I am just charmed with it. I may be out $14 but I think Scuppered was completely worth it.
Sunday, October 14, 2012
Revlon Nail Art Stencils: Stars
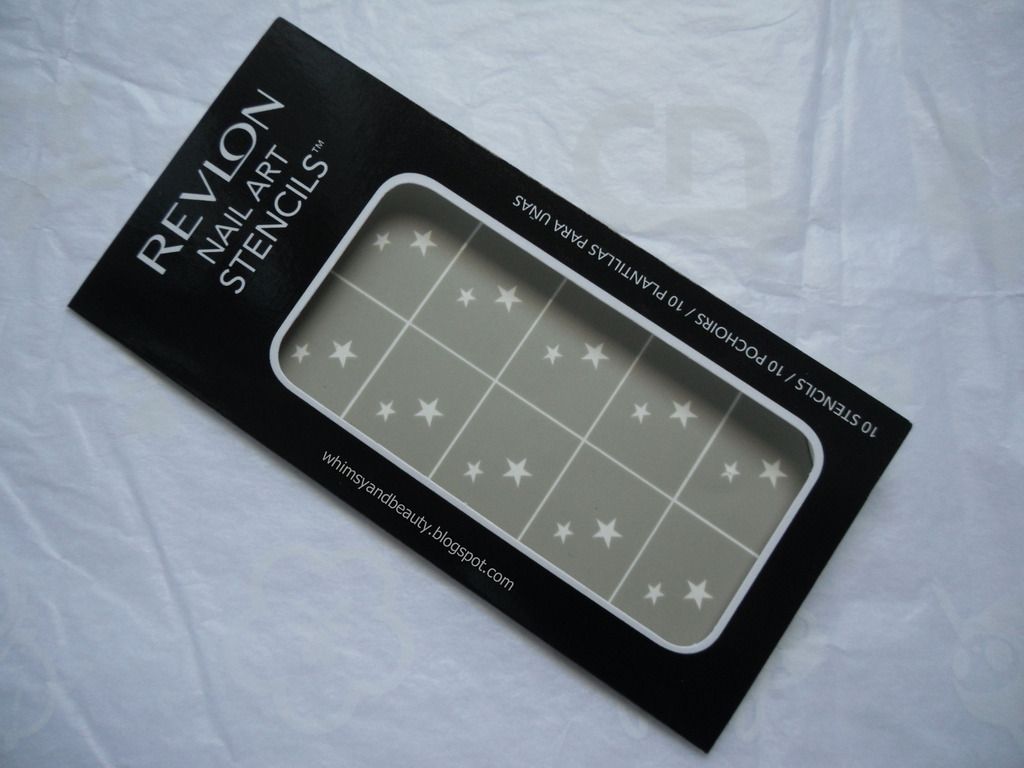
Today I have for you Revlon's Stars stencils! This time, I decided to use some shades from Orly's Cool Romance collection, which just came in the mail from HauteLook. I should probably just get rid of the app on my phone to prevent impulse buys like that one. After testing out the stencils a couple of times, the the result was certainly not what I had expected.
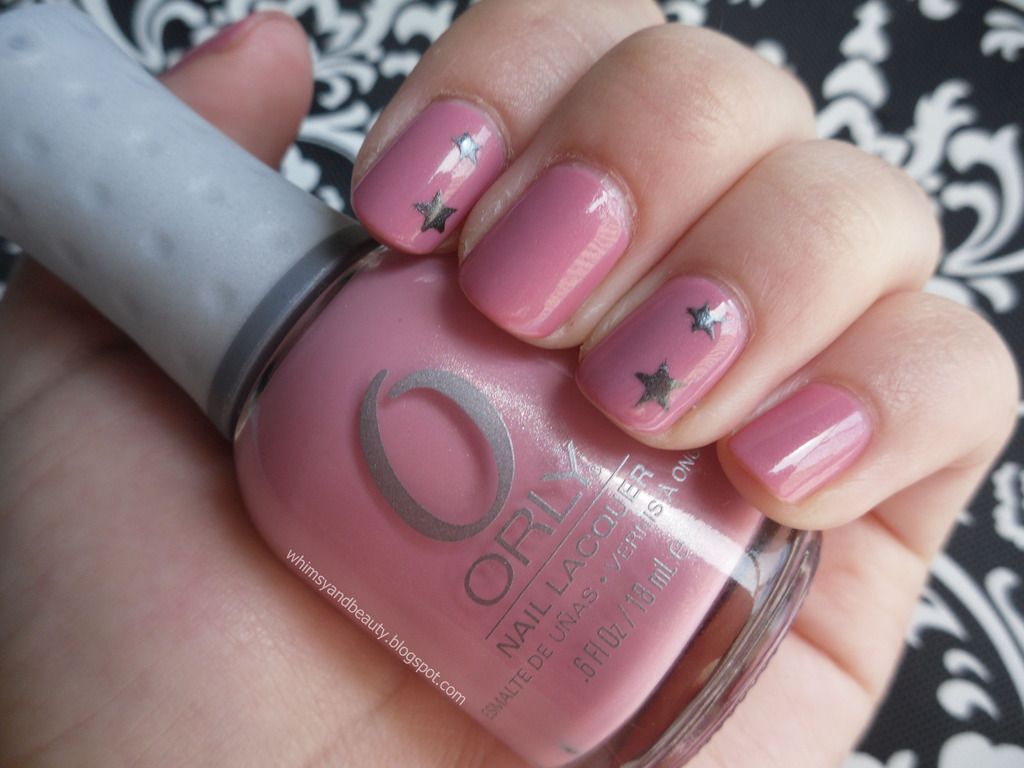
For my base layer, I used Orly's Artificial Sweetener and the Stars are done with Orly's Steel Your Heart.
I found that positioning the stars in a slight diagonal like I did in the photo below, looked the best. One of the downfalls with this particular stencil is that the star points do not turn out consistent, especially for the smaller star. When I look at the stencil itself, the star points all appear nice and even, but once I used it and peeled it away, I had points that are shorter or thicker.
I would have to say that this stencil didn't impress me as much as the bow stencil did. Although the outcome was admittedly cute, I had expected a sharper looking stars than what I ended up with.
If you want to give this stencil a go yourself, it will only cost you about $5. I purchased mine at my local Walgreens.
Saturday, October 13, 2012
bareMinerals READY: Touch Up Veil
I have been a long time customer of bareMinerals. I've been using their mineral foundations since I was in high school along with their mineral veil. To this day, I still use their mineral veil to finish off my foundation routine, no matter if I'm using mineral, liquid, or cream foundation. So when I finally finished the last bit of my mineral veil, I decided to try bareMinerals Ready Touch Up Veil, which from what I understand is the pressed version of their mineral veil.
Wednesday, October 10, 2012
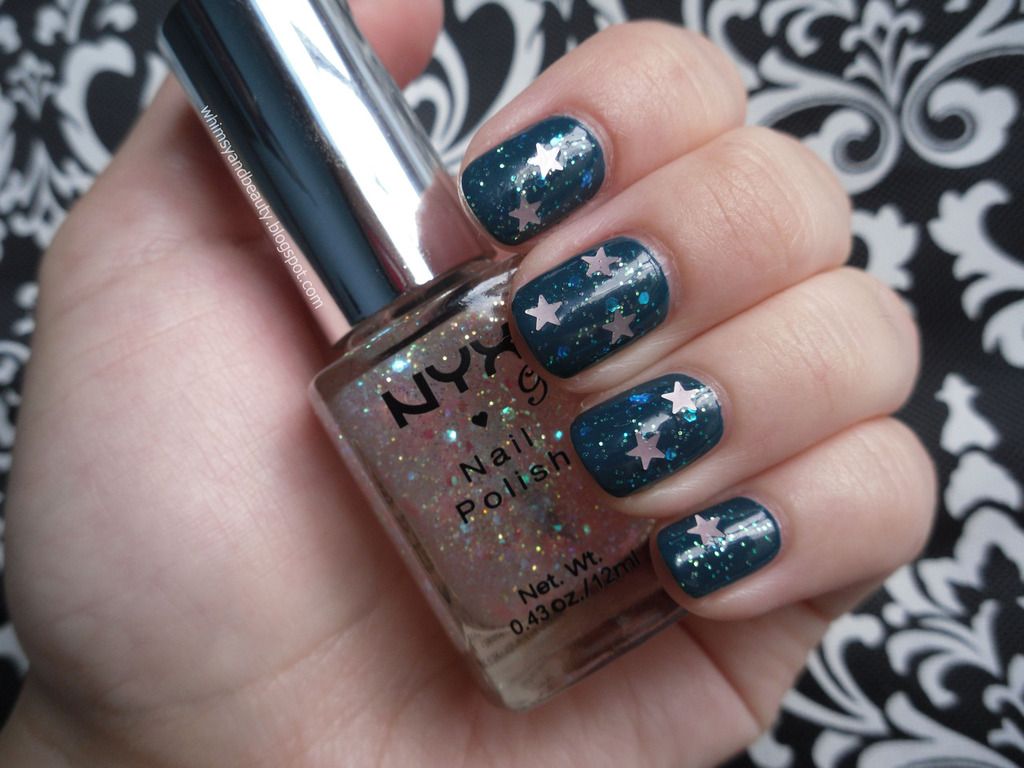
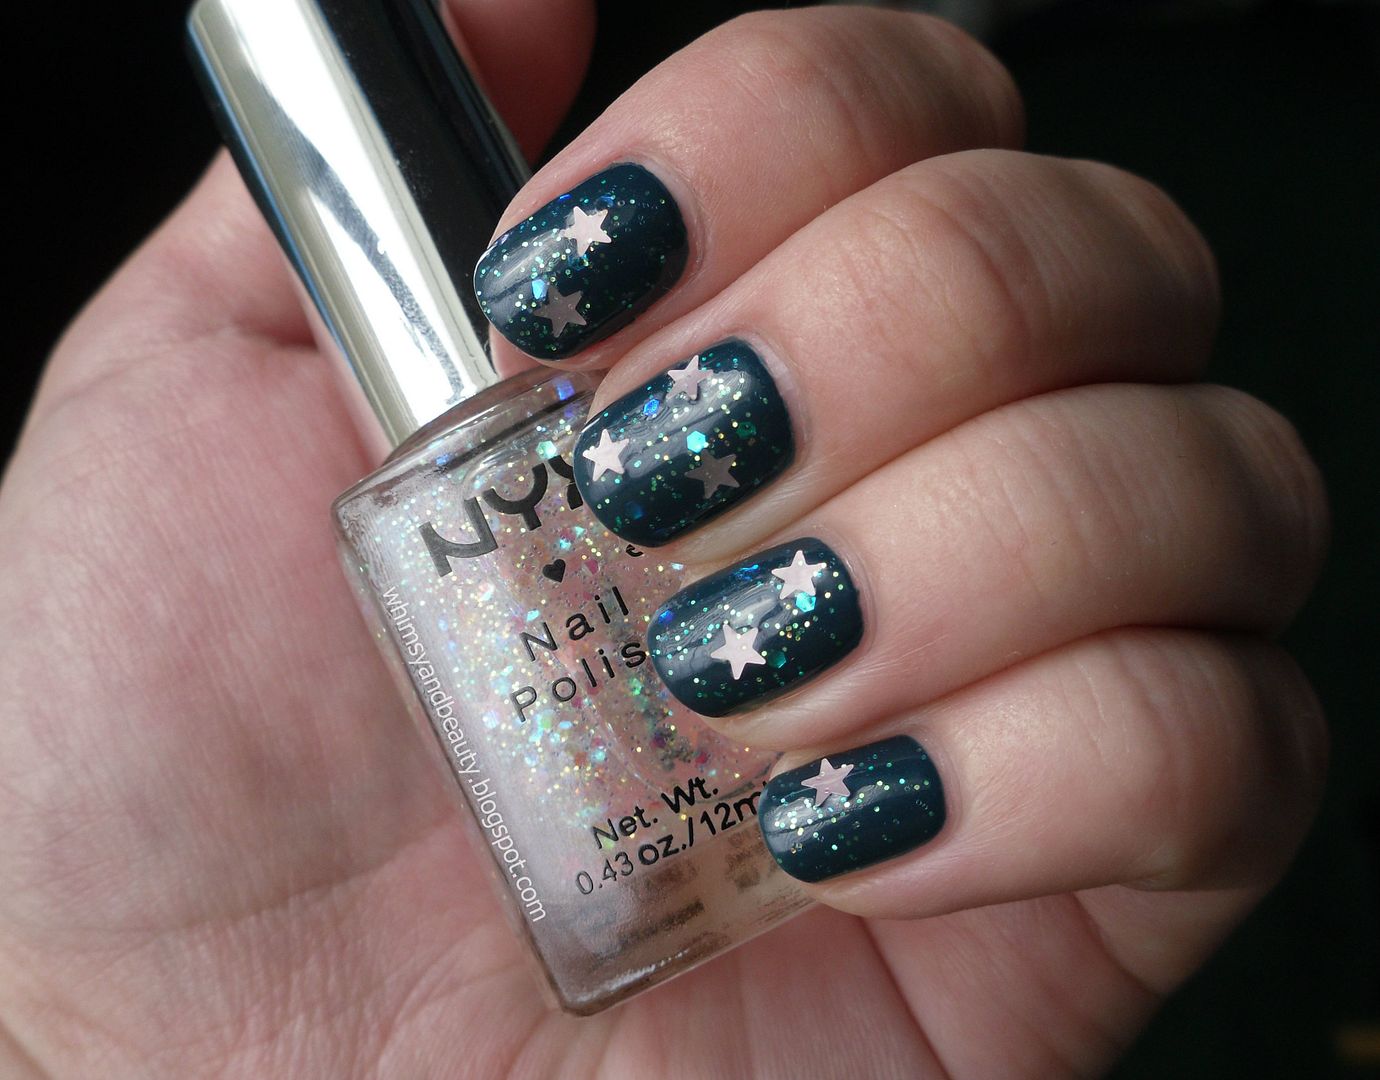
NYX Girls: Dreamy Glitter
Today, I have quite a cute and fun glitter to showcase. I personally like the NYX Girls line of nail polish a great deal and I am very excited that a local store is now carrying nearly the entire selection of polish shades. I have no idea why, but this particular stores sells them for only $1.25 a pop, but I'm not going to complain about quality nail polish for cheap.
Dreamy Glitter is a mixture of iridescent tiny round and hexagonal glitters, plus pale pink star shaped glitters all suspended in a clear base. The coverage is rather thin even though the formula is thick so you could definitely end up in a situation where you brush off all the glitter you had just applied trying to place those bigger star shaped glitters. In addition, those star glitters are tricky to coax out of the bottle as well. What is great about the formula is that there's enough time to work with the glitter since the clear base won't quickly turn into a streaky or gooey mess. That does mean that there is a bit more drying time needed, but not much.
Since I would usually automatically want to layer glitters like this over pastel type of colors, I decided to try the opposite. My base is Revlon Colorstay in Midnight, a deep teal creme. Although, I love the effect, photographing the color was a pain since teal type shades never come out true for me. However, in person, the combination is so whimsical and cute. The iridescent tone of the glitter takes on more of a golden and greenish glow because of my base shade. I did have to apply 2 to 3 layers of topcoat though, which sounds excessive but the points on those stars are persistent in poking through and that can lead to the star glitter peeling off partially once a point gets caught on clothing and such.
If you're ever in San Francisco, I suggest you visit the Variety Shop, where I purchased my NYX polish and most of all my other NYX cosmetics too. L.A. Cosmetics and Red Cherry lashes are also available there among the hundred other random things they sell. They also have a second store a few blocks away on 7th Avenue which is just a newer version of their original store.
Sunday, September 30, 2012
Revlon Nail Art Stencils: Bows
Is it just me or does it seem like new collections are being released more frequently this fall. Wandering through my Walgreens to pick up some cold remedies and what not, I came across Revlon's Sweetly Sinister nail art display. It's obviously gearing towards Halloween, but some of the stencils aren't Halloween specific.
Saturday, September 29, 2012
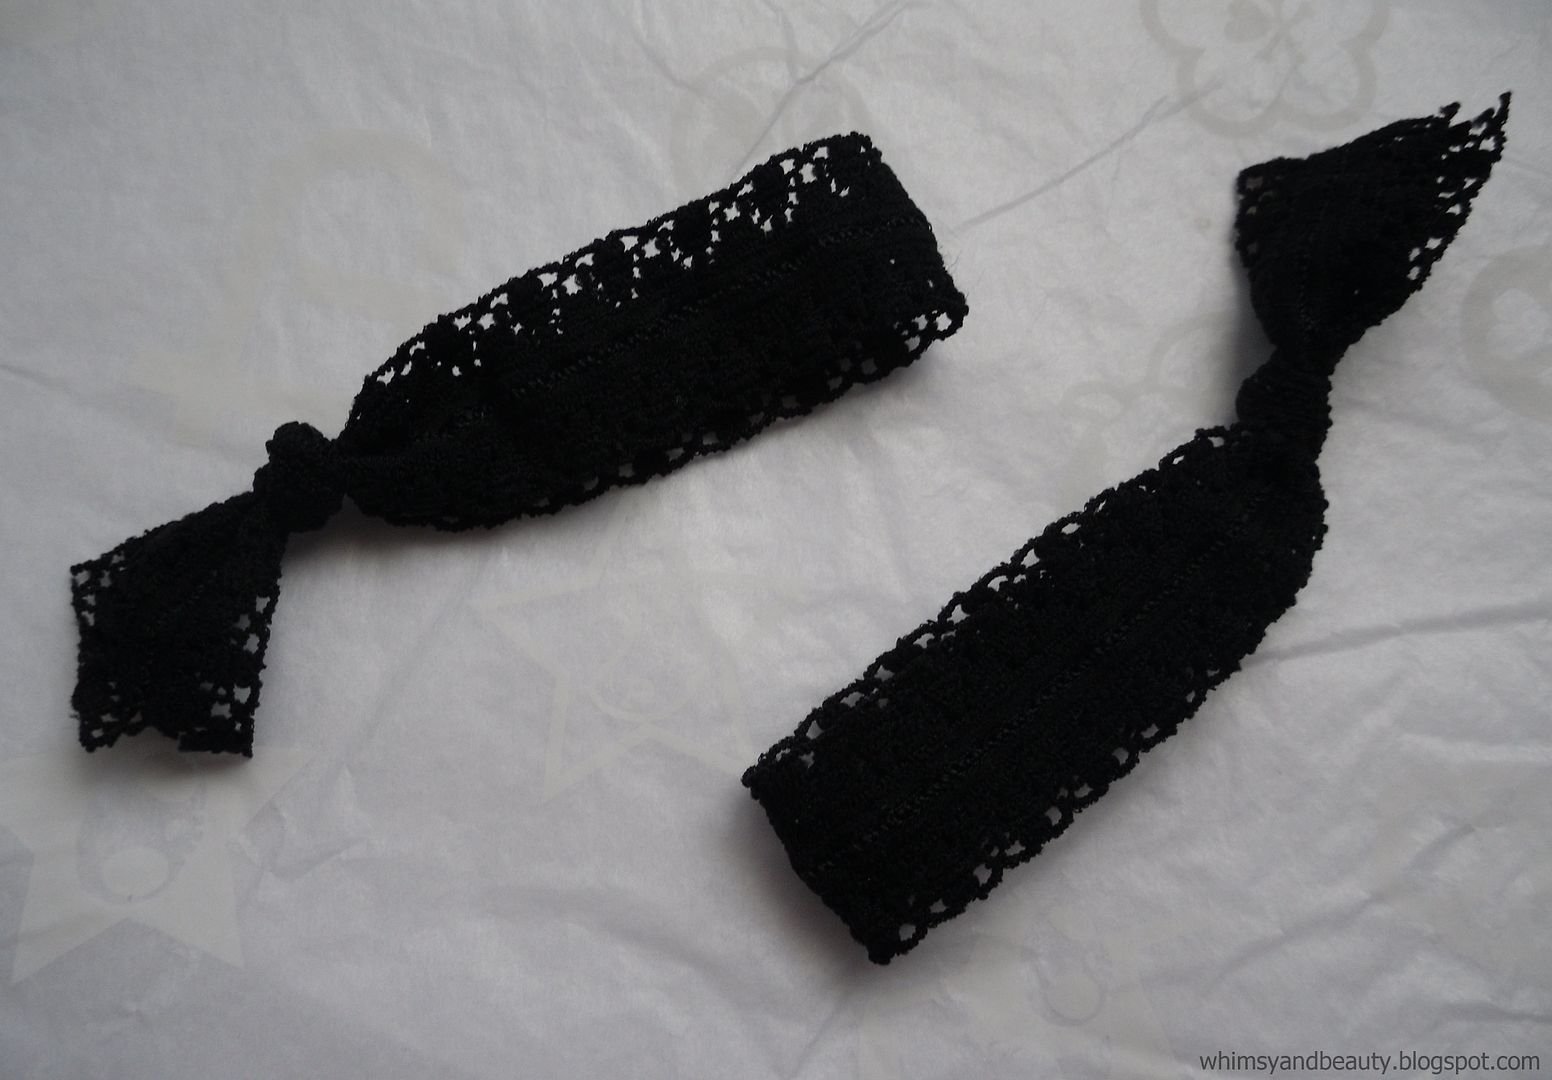
DIY Lace Twistbands or Ribbon Ties
I have to say, that I never anticipated the popularity of my DIY Twistband post. It was my first post to blogger and at the time, I figured that since I was able to successfully replicate these cute hair ties, I would share my knowledge. Very recently, a comment mentioned lace Twistbands and that had me considering my own attempt at lace ones. After my original post, I came across black lace foldover trim at my local fabric outlet and I bought a yard for $0.50 just to see if it would turn out well. FYI, one yard of trim can produce around 5 hair ties, so it's $0.10 a piece!
Saturday, September 15, 2012
Monday, September 3, 2012
Maybelline Color Show: Metal Icon
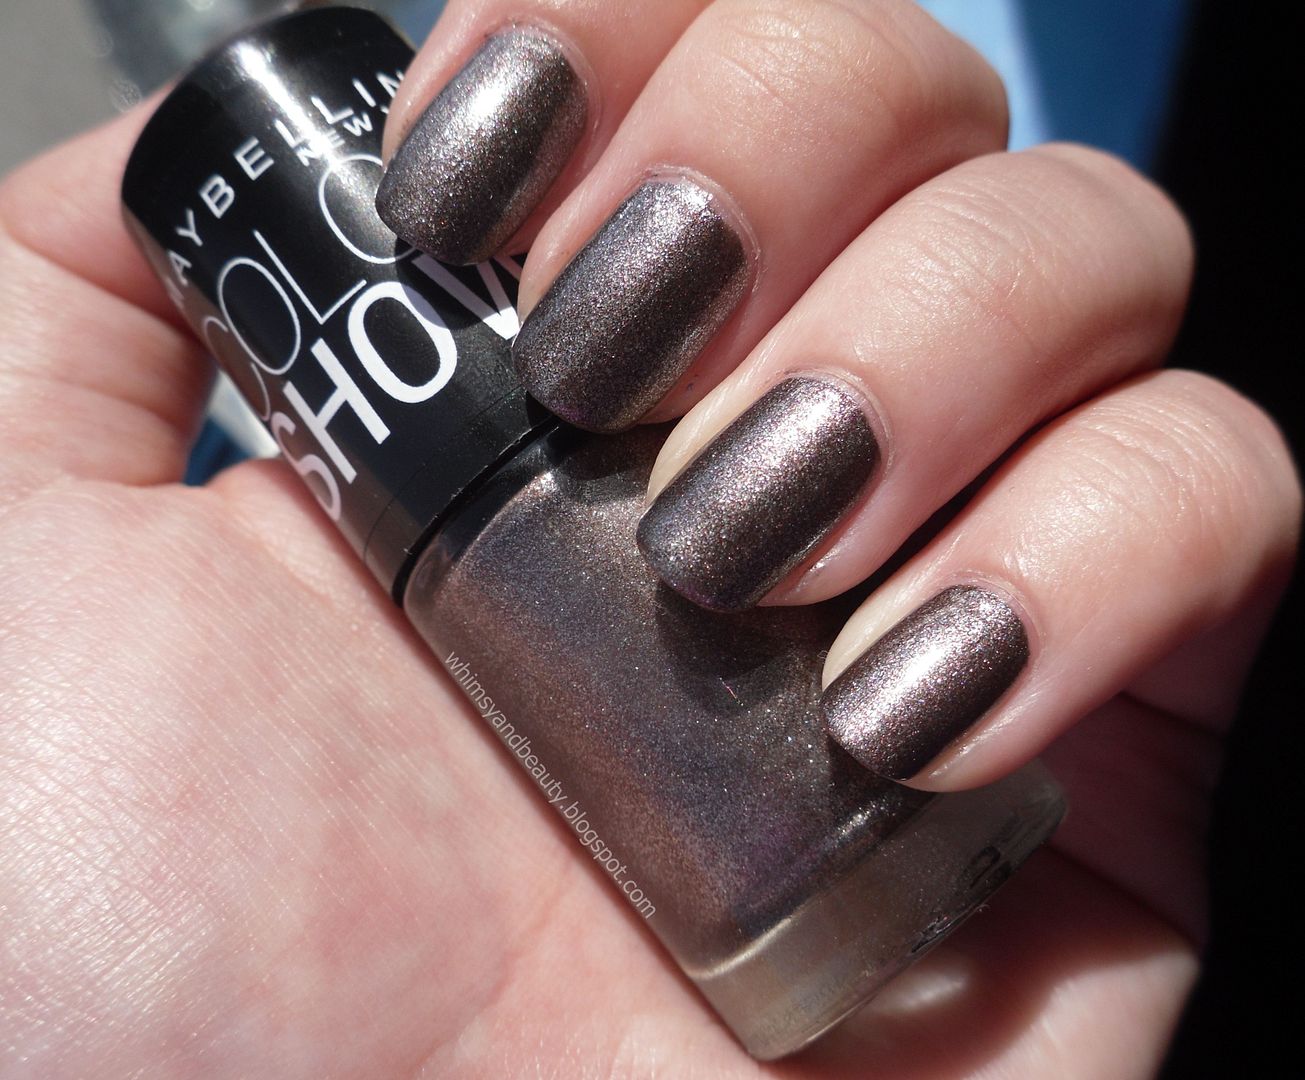
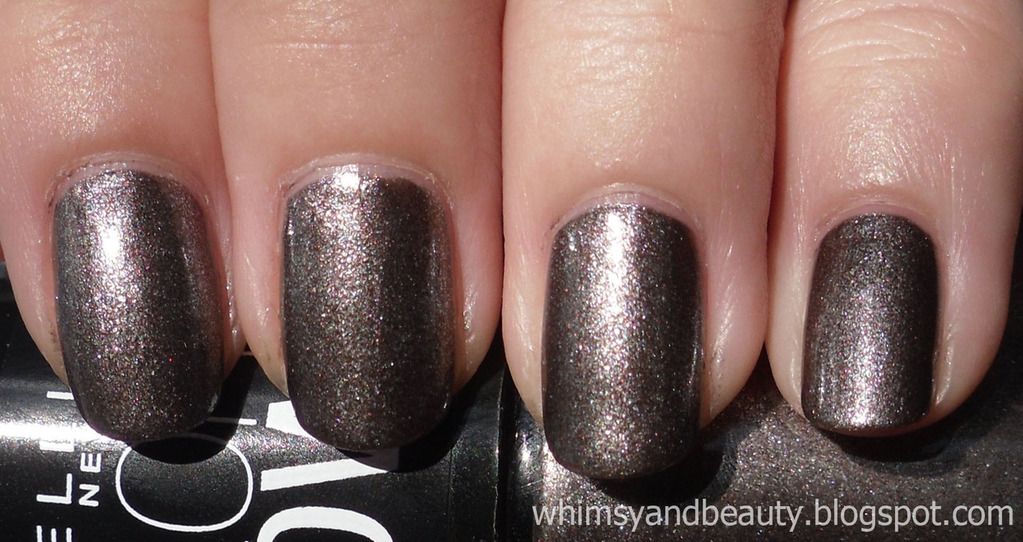
Welcome back fall shades! I've been rather excited to be dipping into all my fall nail colors and the first one I decided to start with was Maybelline's new limited edition Color Show polish in Metal Icon.
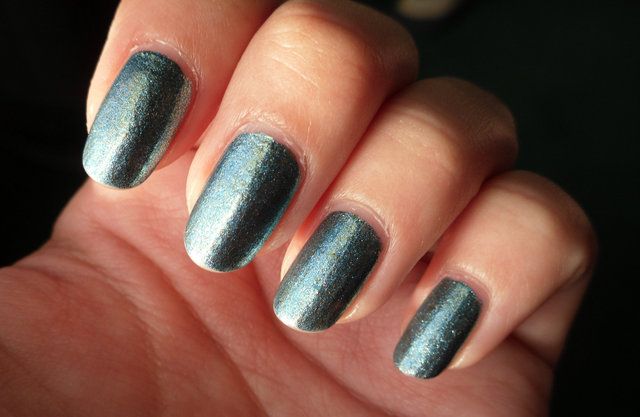
To be honest, I had to spend quite a bit of time deciding on how I would describe this shade. At the moment, I'm satisfied with calling it a smokey gunmetal grey color with copper or bronze particles mixed in. If I spent anymore time trying to decipher the composition of this polish, I'd probably go cross-eyed quick. The coppery addition really warms up this polish while giving more depth and texture. I also really love the fact that this color is so wearable and matches with almost everything. It's definitely a classy but edgy shade without being too loud.
The application was wonderfully easy and smooth with this one. I did have to use 3 coats to have a completely even opaqueness though. Clean up was a bit tricky because all the little bits of shimmer are rather stubborn, but that seems to be a regular issue whenever I use foil type polishes anyways.
The one bummer is the fact that all the Color Show polishes are only 0.23 fl. oz. for $5.49 at my local Walgreens. Maybelline really skimped on the amount of product being sold with the Color Show line. The bottle shape is also deceiving since I thought it was around standard size when I purchased it and didn't bother checking the numbers. I later compared it to one of my Wet n' Wild Chrome bottles, which is 0.29 fl. oz and the Maybelline bottle looked like the bigger one. So I'd definitely wait for some sort of sale before picking up any more polishes for Maybelline in the future. In the mean time, since I already own Metal Icon, I'm going to enjoy it.
Monday, August 20, 2012
Butter London: Trustafarian
Well, I couldn't help but check out the new fall collection for Butter London. Although, I have to say, I wasn't too impressed with what was offered and the only one that caught my eye was Trustafarian. What an amazing shade it is.
Described as sage green with a golden holographic finish, this polish is a really subtle way to wear holo since the rainbows only show up slightly, under the right circumstances. Most of the time, the polish looks to be packed with tons of silver micro shimmer, but the amount of sparkle totally confused my camera for the most part. In person, Trustafarian is definitely quite a sight. Moreover, the fine holographic shimmer creates a wonderful textural look I can't seem to find the words to convey.
The formula is rather sheer for this one and I had to use 3 to 4 coats to get the coverage seen in the photos, but I found that drying time wasn't a major setback with all the extra coats. I did find that this polish was a bit on the thick side though and almost reaching on the side of goopy, so I think the next time I wear Trustafarian I'll go ahead and add a few drops of thinner to it. Strangely enough, this one left brushstrokes behind during application. It's not very obvious and it started only after I had the bottle open for a bit. I usually begin my application starting with my pinky finger and once I got to my index and thumb, there were some definite inconsistent brushstrokes that needed to be taken care of. I'd say a top coat only helps here in this case.
Despite the minor issue I had with application, I don't regret buying it. Trustafarian is good overall so you won't be taking a big gamble on it. I don't know if anyone has this experience, but for me all my Butter London shimmers or metallic shades all work well enough but when I reach for the creme shades, it's Streaksville here I come. I haven't touched Trout Pout for a while because I'm mad at it at the moment, but I love my Knackered and Disco Biscuit. Oh, I can't forget Tart with a Heart, my glitter obsession! Anyone else see a difference between the Butter London formulations?
Described as sage green with a golden holographic finish, this polish is a really subtle way to wear holo since the rainbows only show up slightly, under the right circumstances. Most of the time, the polish looks to be packed with tons of silver micro shimmer, but the amount of sparkle totally confused my camera for the most part. In person, Trustafarian is definitely quite a sight. Moreover, the fine holographic shimmer creates a wonderful textural look I can't seem to find the words to convey.
The formula is rather sheer for this one and I had to use 3 to 4 coats to get the coverage seen in the photos, but I found that drying time wasn't a major setback with all the extra coats. I did find that this polish was a bit on the thick side though and almost reaching on the side of goopy, so I think the next time I wear Trustafarian I'll go ahead and add a few drops of thinner to it. Strangely enough, this one left brushstrokes behind during application. It's not very obvious and it started only after I had the bottle open for a bit. I usually begin my application starting with my pinky finger and once I got to my index and thumb, there were some definite inconsistent brushstrokes that needed to be taken care of. I'd say a top coat only helps here in this case.
 |
| With flash to bring out that holographic effect. |
Despite the minor issue I had with application, I don't regret buying it. Trustafarian is good overall so you won't be taking a big gamble on it. I don't know if anyone has this experience, but for me all my Butter London shimmers or metallic shades all work well enough but when I reach for the creme shades, it's Streaksville here I come. I haven't touched Trout Pout for a while because I'm mad at it at the moment, but I love my Knackered and Disco Biscuit. Oh, I can't forget Tart with a Heart, my glitter obsession! Anyone else see a difference between the Butter London formulations?
Friday, August 17, 2012
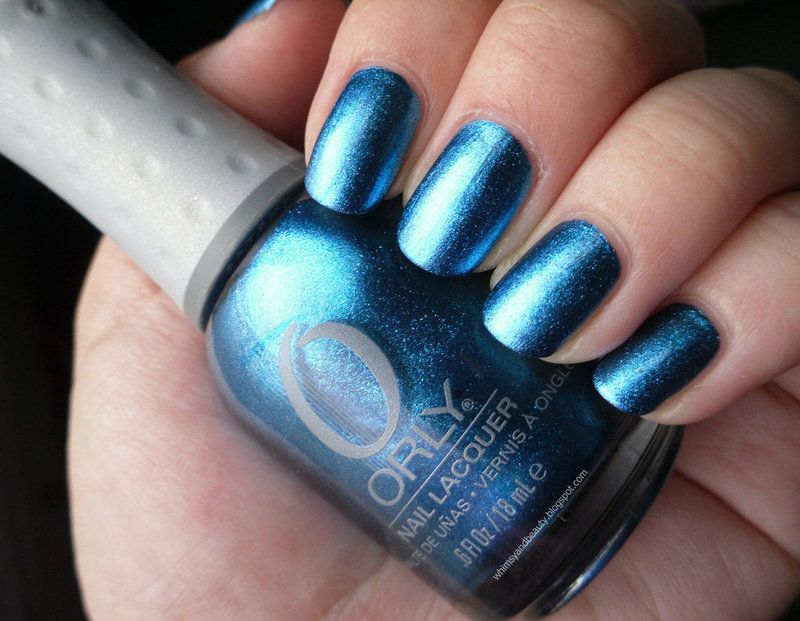
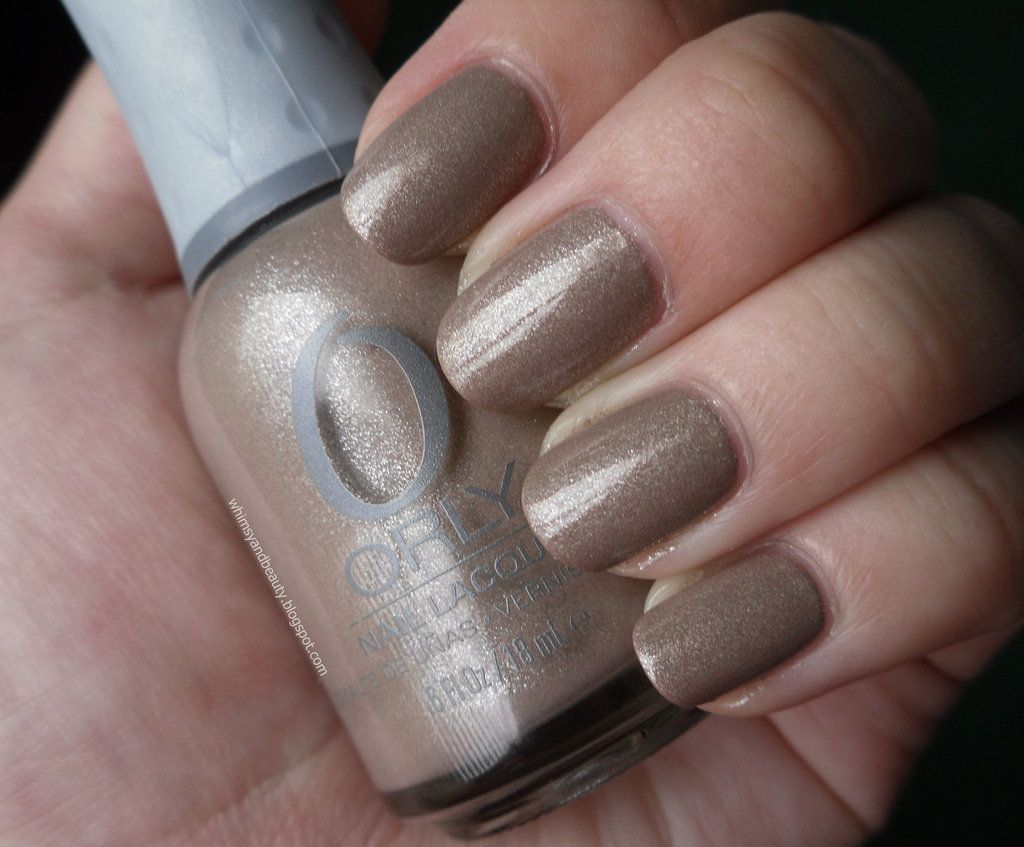
Orly: Sweet Peacock & Nite Owl
So, I'm rather late to the game with these two polishes. Although, I hadn't even realized they were part of the same collection when I purchased each of them. I was at Sally's Beauty when I purchased Sweet Peacock and it was wearing a purple new tag around the neck of bottle even though the shade was released last fall. This would be the second time that I've seen this happen at Sally's with Orly nail polishes. I later then bought Nite Owl at Ulta because I loved China Glaze's Fast Track so much and Nite Owl was just different enough for me to justify buying it. I suppose if you missed out on the Birds of a Feather collection last year, then it's good news to know you can still find them in stores.
I'm going to start with most eye catching of the two I bought. Sweet Peacock is a bright cerulean blue foil. It almost glows on the nails, it's so shiny. I love how it looks on the nails and I only needed two coats to get full opacity while application was a breeze. Amusingly, my brother really likes this shade because it makes him think of a nice shiny paint job on a car, most preferably a sports car. I personally think the color looks like foil candy wrapper.
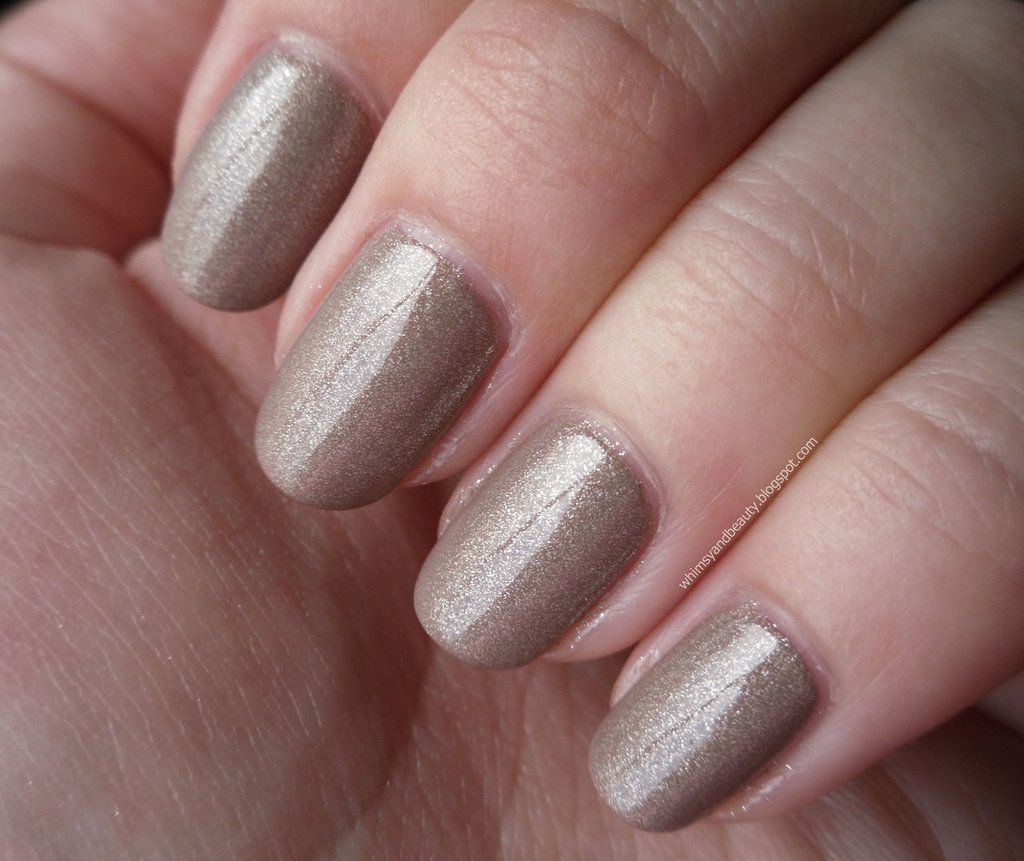
Next up is Nite Owl, a mushroom taupe base with silver shimmer. This one reminded me of China Glaze's Fast Track even though technically Nite Owl came first. Fast Track has a beige base, however, and has gold shimmer instead of silver. The effect is the same though and I think this is the only way I'll wear nearly nude neutrals. Regrettably, I find creme nudes to be utterly boring and can never bring myself to spend the money on them.
As for the formula for Nite Owl, it went on smoothly enough but I felt the drying time was a bit long especially compared to Sweet Peacock. But overall, I was totally smitten with the shade and decided it'll be another of my all year round type of shade.
Sunday, August 12, 2012
The Balm Cosmetics: Mary-Lou Manizer Highlighter
With all the hype that The Balm Cosmetics was getting for their Nude 'Tude eyeshadow palette, I couldn't help but purchase one for myself when it went it showed up at a discounted price on Hautelook. Of course, I also had to browse the rest of what was offered and I ended up with the highlighter too!
Saturday, August 4, 2012
Sunday, July 22, 2012
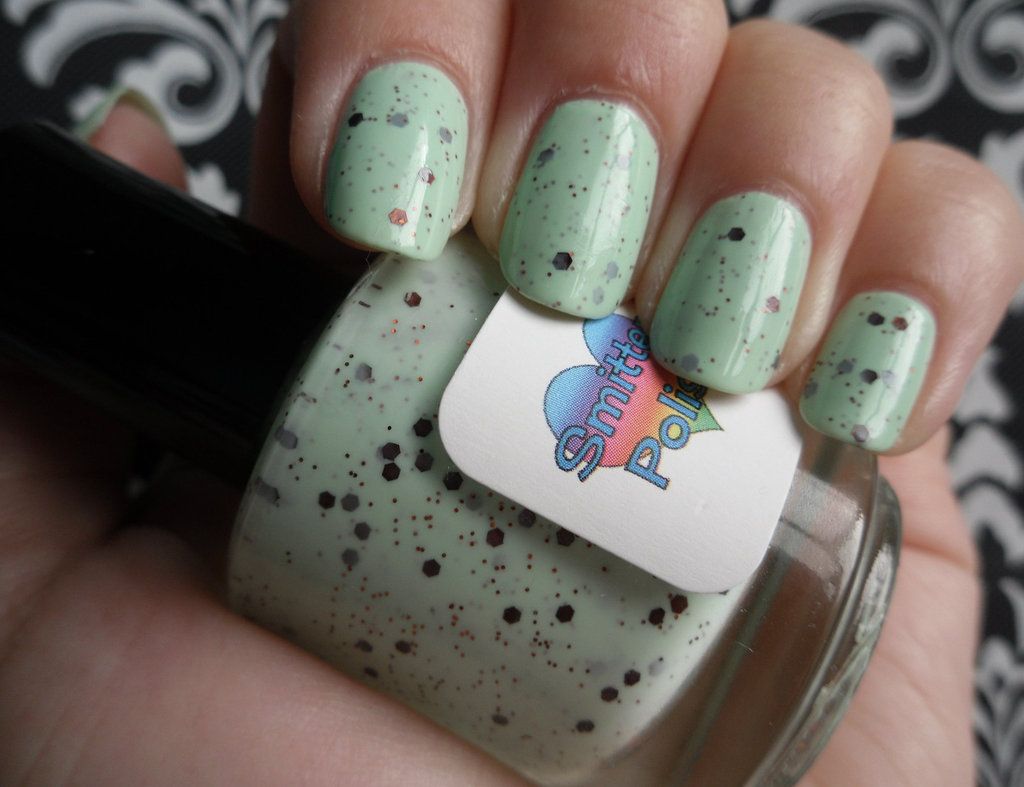
Smitten Polish: Mint Chip
Today I have a delicious indie polish to talk about! The thought of buying indie polish has never crossed my mind before until I saw the swatch by KarenD on her blog, Frazzle and Aniploish. After that, I was obsessed with getting my hands on my own Mint Chip polish.
Friday, July 20, 2012
Wednesday, July 11, 2012
Saturday, June 30, 2012
Dickinson's Original Witch Hazel: Pore Perfecting Toner
With the summer making inconsistent appearances here in San Francisco, I thought I should finally get around to talking about one of my skin care facets that is quite important to me.
Witch hazel has lately become one of the vital elements to caring for my skin. Before witch hazel, I was using Proactiv's Revitalizing Toner and was quite satisfied with the results, however, once I ran out the price was a bit of a sticking point for me. So off to my local drugstore I went and perused the aisles for a more affordable option. With a little bit of research and a glance at the ingredients, I settled for Dickinson's Original Witch Hazel.
Apparently, the Dickinson's brand produces two versions of Witch Hazel, a yellow label dedicated to skin care and a blue label under T.N. Dickinson's meant for first aid. Although, if you take a look at the ingredients, both basically just have witch hazel and alcohol as a preservative. The yellow label says it uses natural grain alcohol while the blue label doesn't specify, but if you take a visit to their website's FAQ, it says that natural alcohol is used. The ingredients for both are so similar that I can't say there's much of a difference between them besides how they are marketed. Personally, I find the yellow bottle more pleasing to look at and it's also shelved near the other skin care products so that's convenient.
The astringent qualities of witch hazel are great for tightening the pores and removing impurities I may have missed when I cleansed my face. I use it twice a day, in the morning and evening, and I feel that it really does keep my skin reasonably balanced. For days I stay at home all day and leave my skin bare, I tend to use it in the middle of the day too, just to give my skin a boost. I also found that I could really reduce the chances for ingrown hairs if I consistently apply it to prone areas, such as the bikini zone. Not to mention, application there helps keep me comfortable when regrowth starts. Believe me, when I get lazy in applying witch hazel to my bikini zone, I can tell and then I wished I had been more diligent about it. Plus,with the arrival of warmer temperatures, I also tend to suffer from heat rashes and witch hazel is fantastic for relieving the irritation and soothing the area.
I have been told that witch hazel can also help prevent canker sores from further developing if applied as soon as you can feel it coming but this bit of information was discovered too late so I don't have any personal experience to share on that front. However, witch hazel has been said to help with bruises also and I have tried this before. I really do feel like my ugly purple bruise was fading more quickly than usual, but I've been lucky enough not to suffer such a severe bruise again so I haven't tested witch hazel on bruises since.
For 16 fl. oz at $6.99, I think Dickinson's Original Witch Hazel is such a wonderful multipurpose product at a price that is really affordable. I'm currently on bottle number three and I have every intention of repurchasing once I run out. If you have combination or oily skin, I highly recommend giving witch hazel a try.
Monday, June 18, 2012
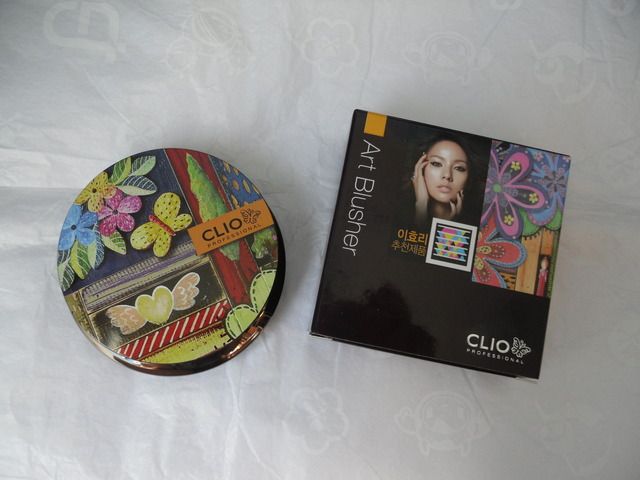
Clio Professional Art Blusher: #1 Peach
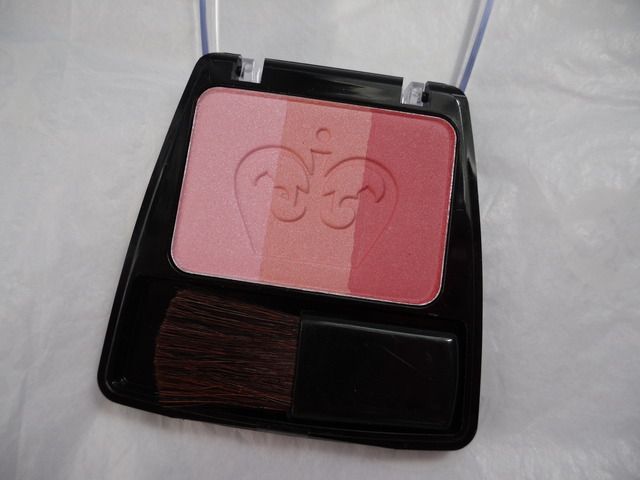
I have been pining after the Clio blushes for a while now. However, I've been holding out for what looks like to be the newer white compact version and it has been a rather futile wait. The only one I was able to find that came in the newer version was #5 Orange Peach at a store near Japan Town but it swatched more like a highlighter than a blush to me and at a $38 price tag, I wasn't about to buy a blusher I couldn't use, just for the packaging. So I ended up picking up #1 Peach in the original compact design instead of the sleeker white one.
Thursday, June 7, 2012
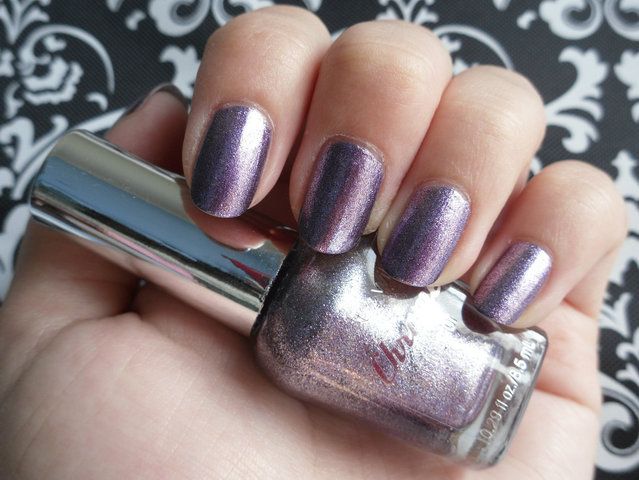
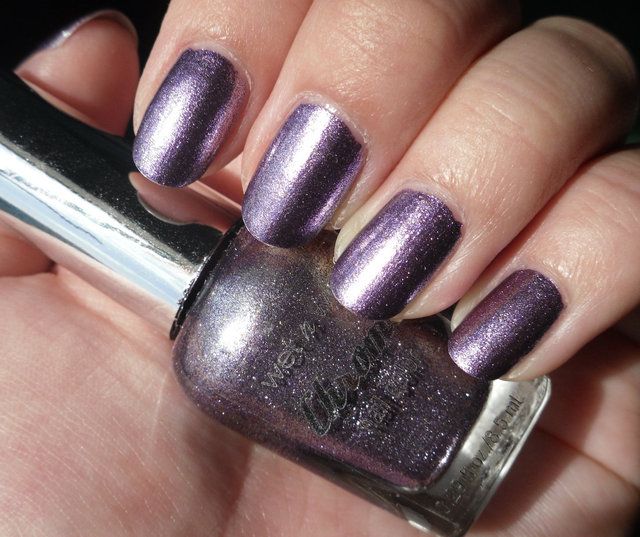
Wet n Wild Chrome Nail Polish: Hog-Quartz School
Continuing on with my foil fixation, I decided to try Hog-Quartz School next. This time, armed with better experience on how to work with these polishes, the time it took to do my nails shortened considerably.
Again, easy formula and quick drying time, but the brush is still subpar. It suffers the same symptoms as the one in Stay Outta My Bismuth so I suggest the same method here. To avoid having the brush create rake marks, be sure to have extra polish on the brush taking into account which nail you are working on and don't press down too hard. This way, you can have even and opaque application in two coats. Admittedly, my thumbs were still an issue because I had a harder time estimating how much extra polish I needed on my brush for them. However, now that I more or less have the method down, using these Chrome polishes are more of a joy.
I bought these for $3.99 each, which I had to cringe a bit at because this bottle only contains 0.29 fl. oz. Most of my other regular sized bottles are at least 0.4 fl. oz. or more. Considering the prices I pay for some of my nail polishes, I wouldn't find this much of a problem except that this collection is limited edition so I would have liked to the a normal amount of product sold to me.
Wednesday, May 30, 2012
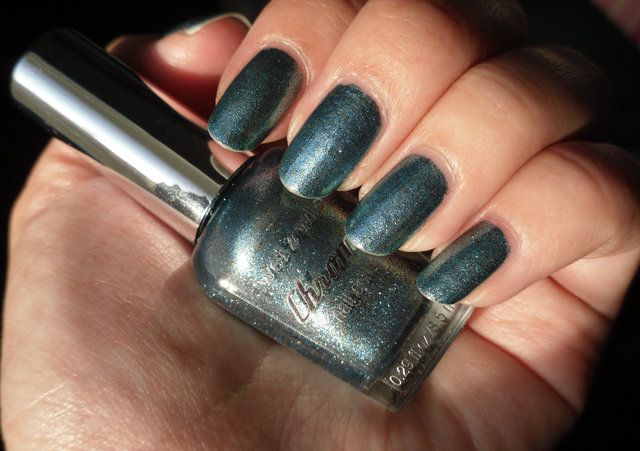
Wet n Wild Chrome Nail Color: Stay Outta My Bismuth
Recently, I've developed an obsession with foil nail polish. I just love the metallic shine of these polishes and the fact that I don't need to deal with brush strokes. So when my local drugstore finally stocked the new Wet n Wild Chrome collection, I couldn't help but leave with three of them!
Stay Outta My Bismuth is a light blue foil polish with bits of greenish gold thrown in. I love the fact that this isn't a solid blue foil. From a distance, it certainly looks blue, but up close this polish looks amazing since the golden flakes show through the blue giving the polish more dimension. The formula itself is fantastic, being smooth and drying quickly. However, the brush is rather unwieldy. It is your standard round cross-section type of brush except a bit denser and shorter. In addition, the tips of the brush seem to be stiffer so as a result the brush itself creates these streaky grooves in the polish during application. The way I've worked around this obstacle is to just have more excess polish on the brush than usual before applying. It definitely minimizes the raking effect the brush causes and since this polish dries so quickly there is no worry in applying a thicker coat.
These photos were actually taken around six days after I originally painted my nails so forgive the fact that the tips don't look pristine. But I did enjoy wearing this shade a great deal. So far I've tried two out of the three I purchased and Stay Outta My Bismuth is my favorite.
Saturday, May 19, 2012
Rimmel London: Autumn Catwalk
Hello again! I've been down and out with fever and horrible sinus pain towards the end of last week. I'm up and about now, but I still get fatigued pretty easily. Plus, there's no better way to lose your writing groove than being bed ridden. I was very excited to get my hands on this blush before getting sick though. For some reason, none of my local drugstores sell any of the Rimmel blushes. Believe me, I checked lots. I was finally able to find them at the Target located in a neighboring city.
Saturday, May 5, 2012
Nyx Girls Nail Polish: Root
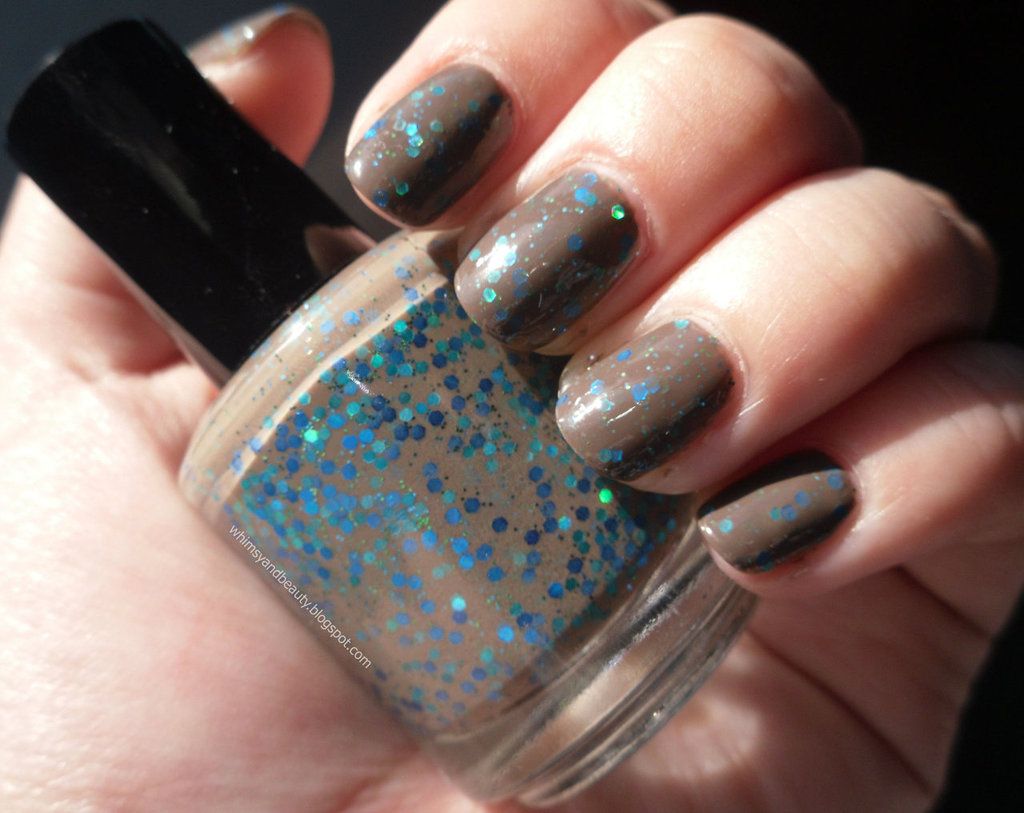
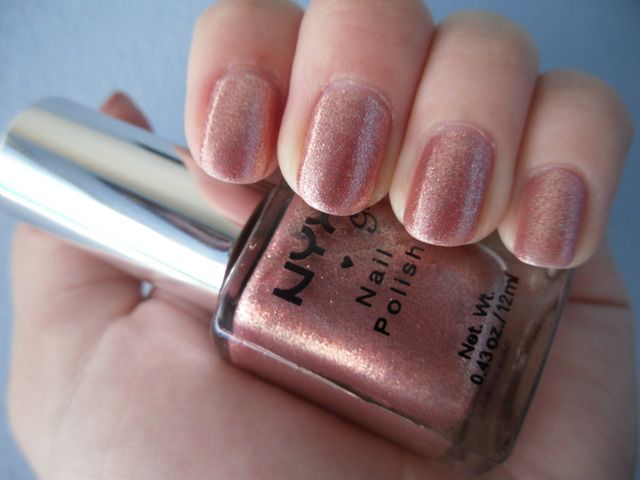
I totally jumped on the bandwagon and bought the Orly nail polish in Rage since the hype was that it was the rose gold shade. To be honest, I was a bit disappointed when I tried it because it looked more silvery with a very slight tint of pink to it. But as I was picking up a Nyx single eyeshadow, I decided to browse the small selection of Nyx Girls polishes and found this little gem.
Urban Decay: 24/7 Naked Travel Pencils
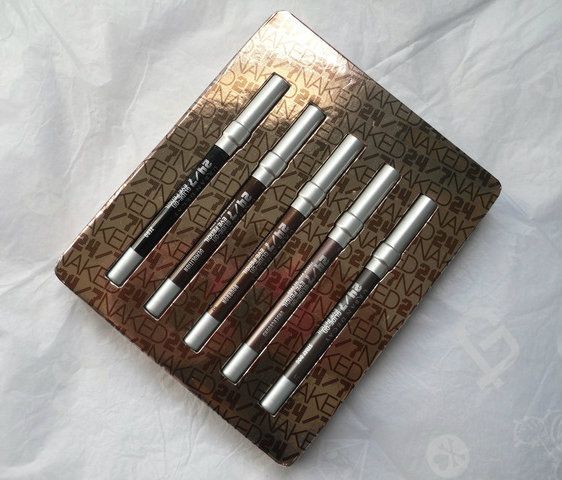
I think having the Hautelook app on my iPhone is a bit dangerous. I've been wanting some new long lasting and smudge proof eyeliners for a while and when the Naked Travel Set showed up on Hautelook, I snapped it up without thinking too much.
Friday, April 27, 2012
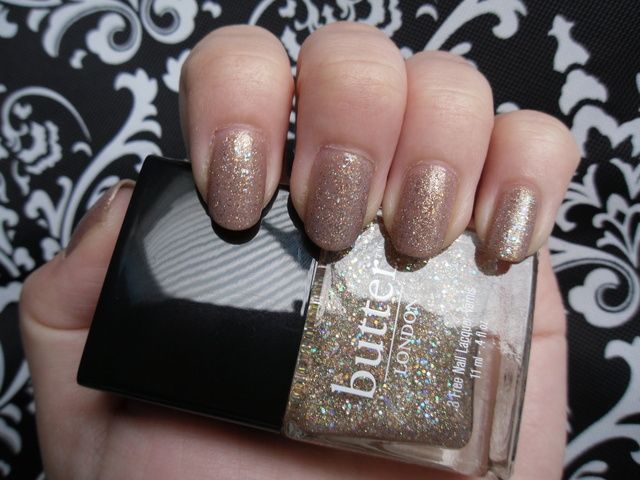
Butter London: Tart with a Heart
I have been avoiding glitter nail polishes for a while now because I'm too lazy to deal with the removal. It's a chore and I'd rather not have to go through it. But when I saw Tart with a Heart, I fell in love with how classy and unusual this polish is.
I have layered this glitter over China Glaze's Fast Track from the recent Hunger Games collection. Although this glitter is gorgeous, it does apply a bit thin so putting it over Fast Track allowed me to achieve the desired glitter density in only two coats. I think this will be one of my favorite combos all year around since it's neutral but attention grabbing. I had several people compliment my nails whenever they had the chance to catch a glimpse of them.
I have layered this glitter over China Glaze's Fast Track from the recent Hunger Games collection. Although this glitter is gorgeous, it does apply a bit thin so putting it over Fast Track allowed me to achieve the desired glitter density in only two coats. I think this will be one of my favorite combos all year around since it's neutral but attention grabbing. I had several people compliment my nails whenever they had the chance to catch a glimpse of them.
Monday, April 23, 2012
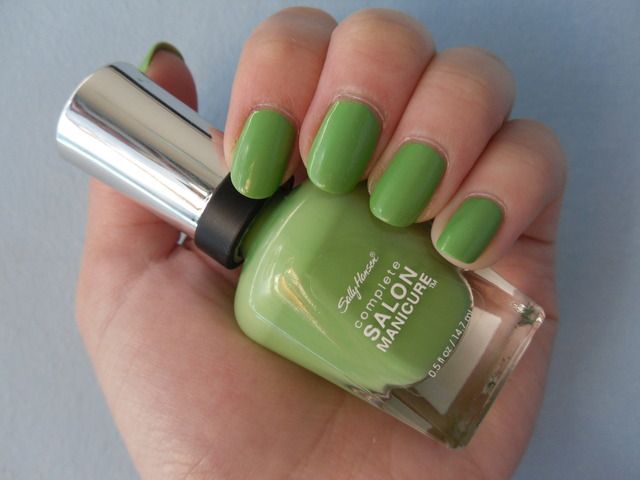
Sally Hansen Complete Salon Manicure: Parrot
It's not quite summer yet in San Francisco, what with the fog and wind we've had. So far we had only two or three days of very warm weather and that was that. Of course that didn't stop me from wanting bright nail polish.
Sunday, April 22, 2012
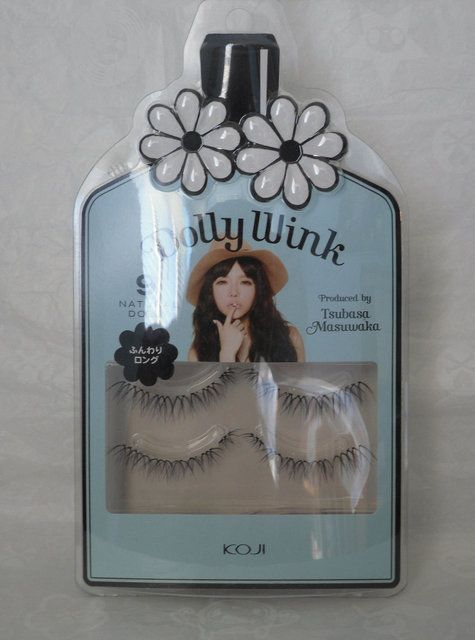
Dolly Wink: Naturally Dolly False Lashes
I've been wanting to use false lashes for a while now, but the ones I can get at my drugstore are actually too overwhelming for my eyes I feel. The lashes can also be too long for my eyes as well. So I've been turning to Asian brands to see what's available.
This was $17.99 at Sune which makes each set about $9 dollars. Definitely pricey for some lashes, but I really liked how they looked. The set comes with a little Dolly Wink lash glue, which I haven't tried. I may one day, but I wanted to work with the lashes using Duo since I know it doesn't cause any allergic reactions for me. Also, on the back you get an example of what the lashes would like on the model's eyes as you can see below. This was really helpful when I was trying to decide which lashes from Dolly Wink I wanted to purchase.
This was $17.99 at Sune which makes each set about $9 dollars. Definitely pricey for some lashes, but I really liked how they looked. The set comes with a little Dolly Wink lash glue, which I haven't tried. I may one day, but I wanted to work with the lashes using Duo since I know it doesn't cause any allergic reactions for me. Also, on the back you get an example of what the lashes would like on the model's eyes as you can see below. This was really helpful when I was trying to decide which lashes from Dolly Wink I wanted to purchase.
Saturday, April 14, 2012
Pink Spring Nails!
This weekend happens to be the Cherry Blossom Festival and I was recently at Japantown which had all the cherry blossom trees in full bloom. So I was feeling like having more pink nails! Plus, I recently received my federal tax refund and splurged a bit on Butter London nail polishes and wanted to incorporate that too.
For the base color, I used Island Coral from Sinful Colors. It's a lovely coral pink creme polish that I have been loving for this spring. I then used Pa Nail Collective polish in Macaroon Orange or A129 as it's identified on the bottle itself, on top to create a pretty silvery shimmer. This polish is so sheer that it can only be used for layering, which is a bummer, but at least it's made my Island Coral even more awesome! Then I used Butter London's Tart with a Heart on my ring fingers.
For the base color, I used Island Coral from Sinful Colors. It's a lovely coral pink creme polish that I have been loving for this spring. I then used Pa Nail Collective polish in Macaroon Orange or A129 as it's identified on the bottle itself, on top to create a pretty silvery shimmer. This polish is so sheer that it can only be used for layering, which is a bummer, but at least it's made my Island Coral even more awesome! Then I used Butter London's Tart with a Heart on my ring fingers.
Subscribe to:
Posts (Atom)

